在 2024 年搭建一个 Ubuntu 16.04 的 pwn 环境。
前言
之前维护了一个基于 Ubuntu 的调试 pwn 题的 docker 镜像,现有的镜像列表 可点击查看,摘录部分如下:
| Ubuntu Version |
Glibc Version |
Pull command |
User/Password |
Status |
| Ubuntu 24.04 |
2.39-0 ubuntu 8 |
docker pull roderickchan/debug_pwn_env: 24.04-2.39-0 ubuntu 8-20240412 |
1. root/root
2. ctf/ctf |
🚩Updating |
| Ubuntu 23.10 |
2.38-1 ubuntu 6.1 |
docker pull roderickchan/debug_pwn_env: 23.10-2.38-1 ubuntu 6.1-20240202 |
1. root/root
2. ctf/ctf |
🚩Updating |
| Ubuntu 23.04 |
2.37-0 ubuntu 2.2 |
docker pull roderickchan/debug_pwn_env: 23.04-2.37-0 ubuntu 2.2-20231211 |
1. root/root
2. ctf/ctf |
🚩Updating |
| Ubuntu 22.04 |
2.35-0 ubuntu 3.6 |
docker pull roderickchan/debug_pwn_env: 22.04-2.35-0 ubuntu 3.6-20240113 |
1. root/root
2. ctf/ctf |
🚩Updating |
| Ubuntu 20.04 |
2.31-0 ubuntu 9.14 |
docker pull roderickchan/debug_pwn_env: 20.04-2.31-0 ubuntu 9.14-20231211 |
1. root/root
2. ctf/ctf |
🚩Updating |
| Ubuntu 21.10 |
2.34-0 ubuntu 3.2 |
docker pull roderickchan/debug_pwn_env: 21.10-2.34-0 ubuntu 3.2-20220707 |
1. root/root
2. roderick |
Archived |
| Ubuntu 21.04 |
2.33-0 ubuntu 5 |
docker pull roderickchan/debug_pwn_env: 21.04-2.33-0 ubuntu 5-20220908 |
1. root/root
2. roderick |
Archived |
| Ubuntu 18.04 |
2.27-3 ubuntu 1.6 |
docker pull roderickchan/debug_pwn_env: 18.04-2.27-3 ubuntu 1.6-20230213 |
1. root/root
2. roderick |
Archived |
| Ubuntu 16.04 |
2.23-0 ubuntu 11.3 |
docker pull roderickchan/debug_pwn_env: 16.04-2.23-0 ubuntu 11.3-20240412 |
1. root/root
2. ctf/ctf |
🚩Updating |
主要的变动是相较于之前的镜像,新增了 Ubuntu-16.04 的镜像。
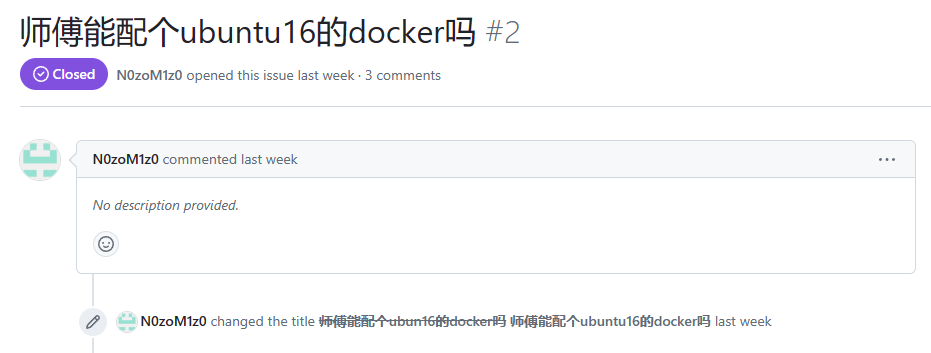
新增镜像主要是由于有位师傅提了一个 issue:
其实很久之前,我自己确实配过一个 Ubuntu-16.04 的调试 pwn 的镜像,但是没有把 Dockerfile 文件留下来,也没有把镜像保存下来。今年已经是 2024 年了, Ubuntu 16.04 已经是 8 年前的系统,很多软件已不支持 Ubuntu 16.04 的环境。不过,既然有师傅提出这个需求,那就必须制作一个 Ubuntu 16.04 的版本的调试环境,毕竟很多入门 pwn 的师傅在学习堆的时候,都是从 glibc-2.23 开始的,而 Ubuntu 16.04 使用的就是这个版本的 glibc。
需要说明的是,以下升级软件的时候,尽量使用 root 用户执行命令,从而能全局安装,如果对升级软件的细节不感兴趣,可以直接跳到最后查看最终的 Dockerfile 文件内容。
安装必备软件
首先安装一些必备软件,执行以下命令即可:
1
2
3
4
|
apt-get update && apt-get -y dist-upgrade && apt-get install -y --fix-missing python3 python3-pip python3-dev lib32z1 \
xinetd curl gcc g++ gdbserver git libssl-dev libffi-dev build-essential tmux \
vim iputils-ping \
file net-tools socat locales autoconf automake libtool make wget
|
升级 ruby 到 2.7
目前 Ubuntu 16.04 制作 pwn 调试环境的镜像遇到的问题都是软件的版本过低,无法满足现有工具的依赖需求。
在构建镜像的时候,第一步就是重新了编译一份 runy 2.7 ,对应的构建语句为:
1
2
3
4
5
6
|
wget http://ftp.ruby-lang.org/pub/ruby/2.7/ruby-2.7.1.tar.gz && \
tar -xzvf ruby-2.7.1.tar.gz && \
cd ruby-2.7.1/ && \
./configure && \
make -j16 && \
make install -j16
|
升级后,就可以安装 one_gadget 和 seccomp-tools 了,安装语句为:
1
|
gem install one_gadget seccomp-tools
|
升级 python 到 3.8
Ubuntu 16.04 的自带的原有的 python 版本是 3.5,版本非常低。导致在 Ubuntu 16.04 系统上运行 python 程序最经常遇到的错误是:python 3.5 不支持 f-string,也就是 f"name: {name}" 这种语法是会直接报错的。所以,我选择将 python 版本升级到 python 3.8。事实上,你也可以升级到最新的版本,但我认为 3.8 已经够用了,所以目前编译的是 3.8 版本。
要从源码编译 python 3.8,执行以下命令即可:
 1
 2
 3
 4
 5
 6
 7
 8
 9
10
11
|
apt-get install -y zlib1g-dev libbz2-dev libncurses5-dev libsqlite3-dev libreadline-dev tk-dev libgdbm-dev \
libdb-dev libpcap-dev xz-utils libexpat1-dev liblzma-dev libc6-dev && \
wget https://www.python.org/ftp/python/3.8.6/Python-3.8.6.tgz && \
tar -xzvf Python-3.8.6.tgz && \
cd Python-3.8.6 && \
./configure --enable-optimizations && \
make -j16 && make install -j16 && rm -rf /usr/bin/pip3 /usr/bin/python3 /usr/bin/python /usr/bin/pip && \
ln -s /usr/local/bin/python3.8 /usr/bin/python3 && \
ln -s /usr/local/bin/python3.8 /usr/bin/python && \
ln -s /usr/local/bin/pip3.8 /usr/bin/pip3 && \
ln -s /usr/local/bin/pip3.8 /usr/bin/pip
|
升级 gdb 到 10.2
从 apt 命令安装的 gdb 默认会使用 python 3.5,这样也就无法安装较新的 pwndbg 插件。所以,我们需要手动升级一下 gdb,编译安装 gdb 10.2。编译安装的命令如下:
1
2
3
4
|
apt-get install -y texinfo && \
wget https://ftp.gnu.org/gnu/gdb/gdb-10.2.tar.gz && \
tar -xzvf gdb-10.2.tar.gz && cd gdb-10.2 && ./configure --enable-targets=all && \
make -j16 && make install -j16
|
这里的命令需要说明的是,由于 pwndbg 目前启动了虚拟环境,所以在遇到了 ImportError: urllib3 v2.0 only supports OpenSSL 1.1.1+, currently the ‘ssl’ module is compiled with OpenSSL 1.0.2g 错误的时候,需要升级一下 urllib3 的版本,执行的命令是:./.venv/bin/pip3 install --upgrade --force-reinstall 'requests==2.6.0' urllib3。最后,在全局环境也执行一下这个命令。
安装 pwndbg
这里我没有选择安装最新的 pwndbg,而是安装了 ubuntu18.04-final 这个版本。因为我升级的 python 是升级到了 3.8,版本也不是最新的版本,所以我没有选择最新的 pwndbg 进行安装。不过这个版本的 pwndbg 已经足够使用了。安装命令如下:
1
2
3
4
|
git clone https://${HUB_DOMAIN}/pwndbg/pwndbg && \
cd ./pwndbg && git checkout ubuntu18.04-final && \
./setup.sh && ./.venv/bin/pip3 install --upgrade --force-reinstall 'requests==2.6.0' urllib3 && \
pip3 install --upgrade --force-reinstall 'requests==2.6.0' urllib3
|
最终的 Dockerfile
以上是主要的步骤,然后再安装一些其他的软件,镜像就制作好了。
最后给出适用于 Ubuntu 16.04 的 Dockerfile,如下:
  1
  2
  3
  4
  5
  6
  7
  8
  9
 10
 11
 12
 13
 14
 15
 16
 17
 18
 19
 20
 21
 22
 23
 24
 25
 26
 27
 28
 29
 30
 31
 32
 33
 34
 35
 36
 37
 38
 39
 40
 41
 42
 43
 44
 45
 46
 47
 48
 49
 50
 51
 52
 53
 54
 55
 56
 57
 58
 59
 60
 61
 62
 63
 64
 65
 66
 67
 68
 69
 70
 71
 72
 73
 74
 75
 76
 77
 78
 79
 80
 81
 82
 83
 84
 85
 86
 87
 88
 89
 90
 91
 92
 93
 94
 95
 96
 97
 98
 99
100
101
102
103
104
105
106
107
108
109
110
111
112
113
114
115
116
117
118
119
120
121
122
123
124
125
126
127
128
129
130
131
132
|
# used for compile ubuntu 16.04 debugging pwn image
# author: roderick
# date: 2024-04-06

ARG BUILD_VERSION

FROM ubuntu:$BUILD_VERSION

ARG DEBIAN_FRONTEND=noninteractive
ARG HUB_DOMAIN=github.com
ARG NORMAL_USER_NAME=ctf

ENV TZ=Etc/UTC
ENV LANG=en_US.UTF-8
ENV LANGUAGE=en_US:en
ENV LC_ALL=en_US.UTF-8

WORKDIR /root

# install ruby 2.7
RUN apt-get update && apt-get -y dist-upgrade && apt-get install -y --fix-missing python3 python3-pip python3-dev lib32z1 \
    xinetd curl gcc g++ gdbserver git libssl-dev libffi-dev build-essential tmux \
    vim iputils-ping \
    file net-tools socat locales autoconf automake libtool make wget && \
    wget http://ftp.ruby-lang.org/pub/ruby/2.7/ruby-2.7.1.tar.gz && \
    tar -xzvf ruby-2.7.1.tar.gz && \
    cd ruby-2.7.1/ && \
    ./configure && \
    make -j16 && \
    make install -j16 && \
    gem install one_gadget seccomp-tools && \
    sed -i '/en_US.UTF-8/s/^# //g' /etc/locale.gen && locale-gen

# install python 3.8
RUN apt-get install -y zlib1g-dev libbz2-dev libncurses5-dev libsqlite3-dev libreadline-dev tk-dev libgdbm-dev \
    libdb-dev libpcap-dev xz-utils libexpat1-dev liblzma-dev libc6-dev && \
    wget https://www.python.org/ftp/python/3.8.6/Python-3.8.6.tgz && \
    tar -xzvf Python-3.8.6.tgz && \
    cd Python-3.8.6 && \
    ./configure --enable-optimizations && \
    make -j16 && make install -j16 && rm -rf /usr/bin/pip3 /usr/bin/python3 /usr/bin/python /usr/bin/pip && \
    ln -s /usr/local/bin/python3.8 /usr/bin/python3 && \
    ln -s /usr/local/bin/python3.8 /usr/bin/python && \
    ln -s /usr/local/bin/pip3.8 /usr/bin/pip3 && \
    ln -s /usr/local/bin/pip3.8 /usr/bin/pip

# install gdb manually
RUN apt-get install -y texinfo && \
    wget https://ftp.gnu.org/gnu/gdb/gdb-10.2.tar.gz && \
    tar -xzvf gdb-10.2.tar.gz && cd gdb-10.2 && ./configure --enable-targets=all && \
    make -j16 && make install -j16


# 先执行容易失败的操作
RUN git clone https://${HUB_DOMAIN}/pwndbg/pwndbg && \
    cd ./pwndbg && git checkout ubuntu18.04-final && \
    ./setup.sh && ./.venv/bin/pip3 install --upgrade --force-reinstall 'requests==2.6.0' urllib3 && \
    pip3 install --upgrade --force-reinstall 'requests==2.6.0' urllib3

# install patchelf
RUN wget https://mirrors.tuna.tsinghua.edu.cn/ubuntu/pool/universe/p/patchelf/patchelf_0.9-1~ubuntu16.04.3_amd64.deb && \
    dpkg -i patchelf_0.9-1~ubuntu16.04.3_amd64.deb

RUN git clone https://${HUB_DOMAIN}/hugsy/gef.git && \
    git clone https://${HUB_DOMAIN}/RoderickChan/Pwngdb.git && \
    git clone https://${HUB_DOMAIN}/Gallopsled/pwntools && \
    pip3 install --upgrade --editable ./pwntools && \
    git clone https://${HUB_DOMAIN}/RoderickChan/pwncli.git && \
    pip3 install --upgrade --editable ./pwncli


COPY ./gdb-gef /bin
COPY ./gdb-pwndbg /bin
COPY ./update.sh /bin
COPY ./test-this-container.sh /bin
COPY ./heaptrace /bin
COPY ./.tmux.conf ./
COPY ./.gdbinit ./
COPY ./flag /
COPY ./flag /flag.txt

RUN chmod +x /bin/gdb-gef /bin/gdb-pwndbg /bin/update.sh /bin/test-this-container.sh /bin/heaptrace && \
    echo "root:root" | chpasswd && \
    pip3 install ropper capstone z3-solver qiling lief

# root user
RUN useradd ${NORMAL_USER_NAME} -d /home/${NORMAL_USER_NAME} -m -s /bin/bash -u 1001 && \
    echo "${NORMAL_USER_NAME}:${NORMAL_USER_NAME}" | chpasswd && \
    cp -r /root/pwndbg /home/${NORMAL_USER_NAME} && \
    cp -r /root/gef /home/${NORMAL_USER_NAME} && \
    cp -r /root/pwntools /home/${NORMAL_USER_NAME} && \
    cp -r /root/Pwngdb /home/${NORMAL_USER_NAME} && \
    cp -r /root/pwncli /home/${NORMAL_USER_NAME} && \
    cp /root/.tmux.conf /home/${NORMAL_USER_NAME} && \
    cp /root/.gdbinit /home/${NORMAL_USER_NAME} && \
    cp /flag /home/${NORMAL_USER_NAME} && \
    cp /flag.txt /home/${NORMAL_USER_NAME} && \
    chown -R ${NORMAL_USER_NAME}:${NORMAL_USER_NAME} /home/${NORMAL_USER_NAME}

USER ${NORMAL_USER_NAME}:${NORMAL_USER_NAME}

WORKDIR /home/${NORMAL_USER_NAME}

RUN pip3 install --upgrade --editable ./pwntools && \
    pip3 install --upgrade --editable ./pwncli && \
    pip3 install --upgrade --force-reinstall 'requests==2.6.0' urllib3


# switch to root and install zsh
USER root:root
RUN apt-get install -y sudo zsh && usermod -s /bin/zsh ${NORMAL_USER_NAME} && \
    echo "${NORMAL_USER_NAME} ALL=(ALL) NOPASSWD : ALL" | tee /etc/sudoers.d/${NORMAL_USER_NAME}sudo

# switch 2 normal user
USER ${NORMAL_USER_NAME}:${NORMAL_USER_NAME}
WORKDIR /home/${NORMAL_USER_NAME}


# install on-my-zsh
RUN curl -fsSL -O https://raw.githubusercontent.com/ohmyzsh/ohmyzsh/master/tools/install.sh && \
    chmod +x  ./install.sh && \
    sed -i -e 's/read[[:space:]]*-r[[:space:]]*opt/opt=n/g' ./install.sh && \
    ./install.sh && \
    git clone https://github.com/zsh-users/zsh-syntax-highlighting.git ${ZSH_CUSTOM:-~/.oh-my-zsh/custom}/plugins/zsh-syntax-highlighting && \
    git clone https://github.com/zsh-users/zsh-autosuggestions ${ZSH_CUSTOM:-~/.oh-my-zsh/custom}/plugins/zsh-autosuggestions

COPY ./.zshrc ./

# expose some ports
EXPOSE 20 21 22 80 443 23946 10001 10002 10003 10004 10005

CMD ["/bin/update.sh"]
|
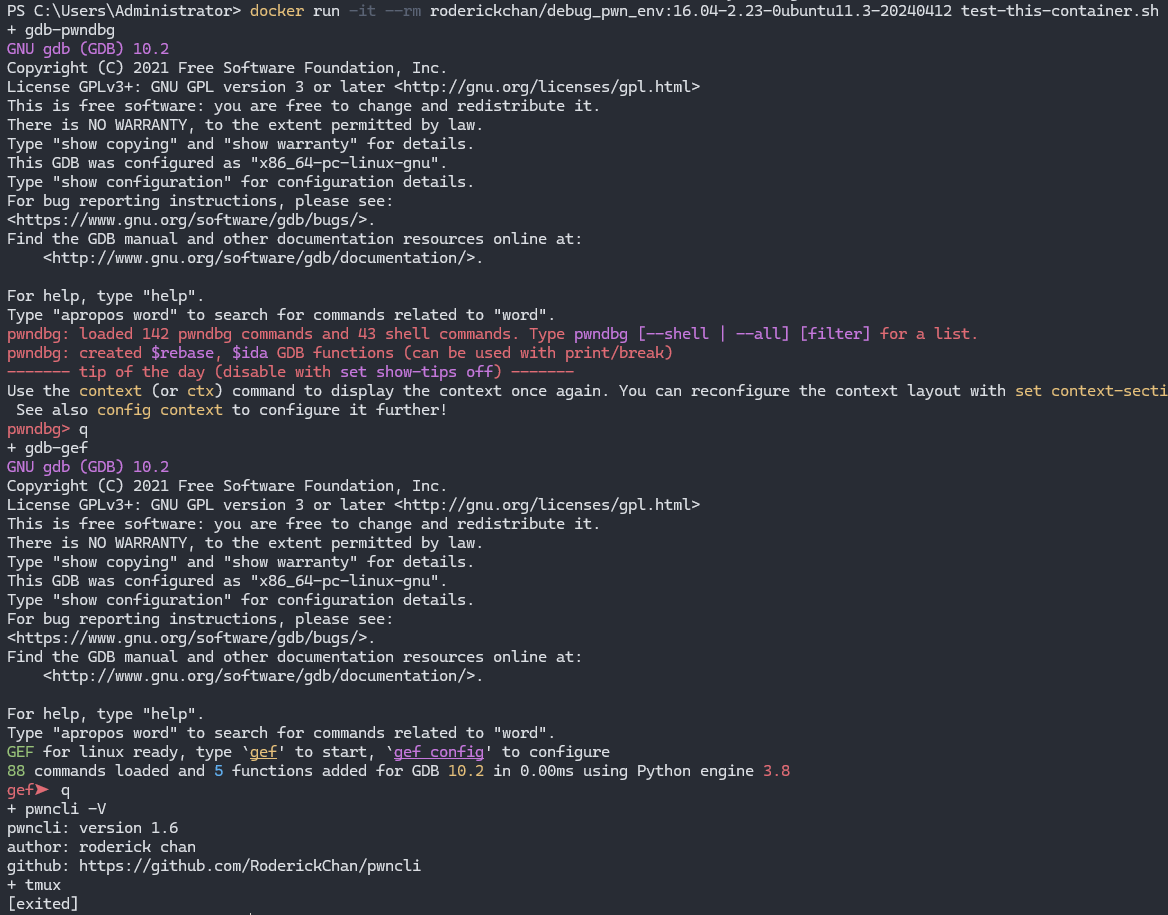
目前镜像已经推送到了 dockerhub,可以直接执行命令 docker pull roderickchan/debug_pwn_env: 16.04-2.23-0 ubuntu 11.3-20240412 下载镜像使用。
镜像的启动的截图如下:
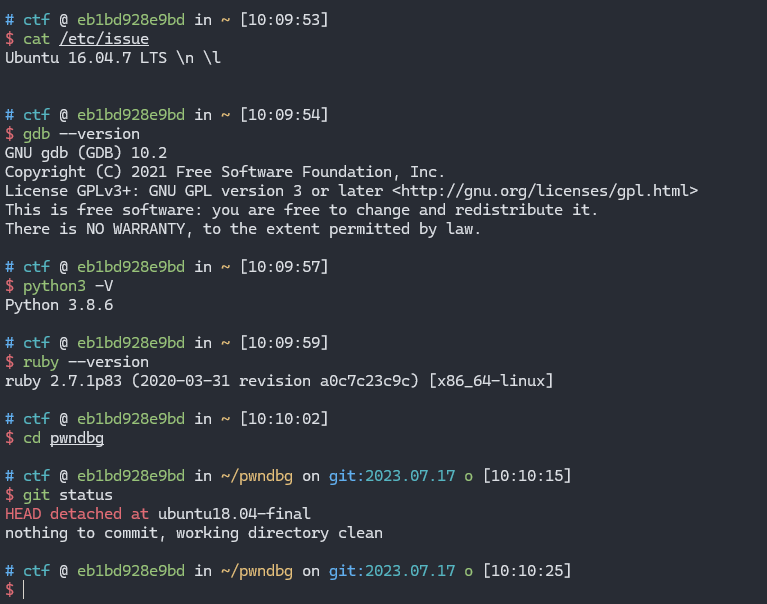
软件版本:
欢迎关注我的公众号roderick blog,原创文章第一时间推送~

 roderick
 支付宝
支付宝
 微信
微信